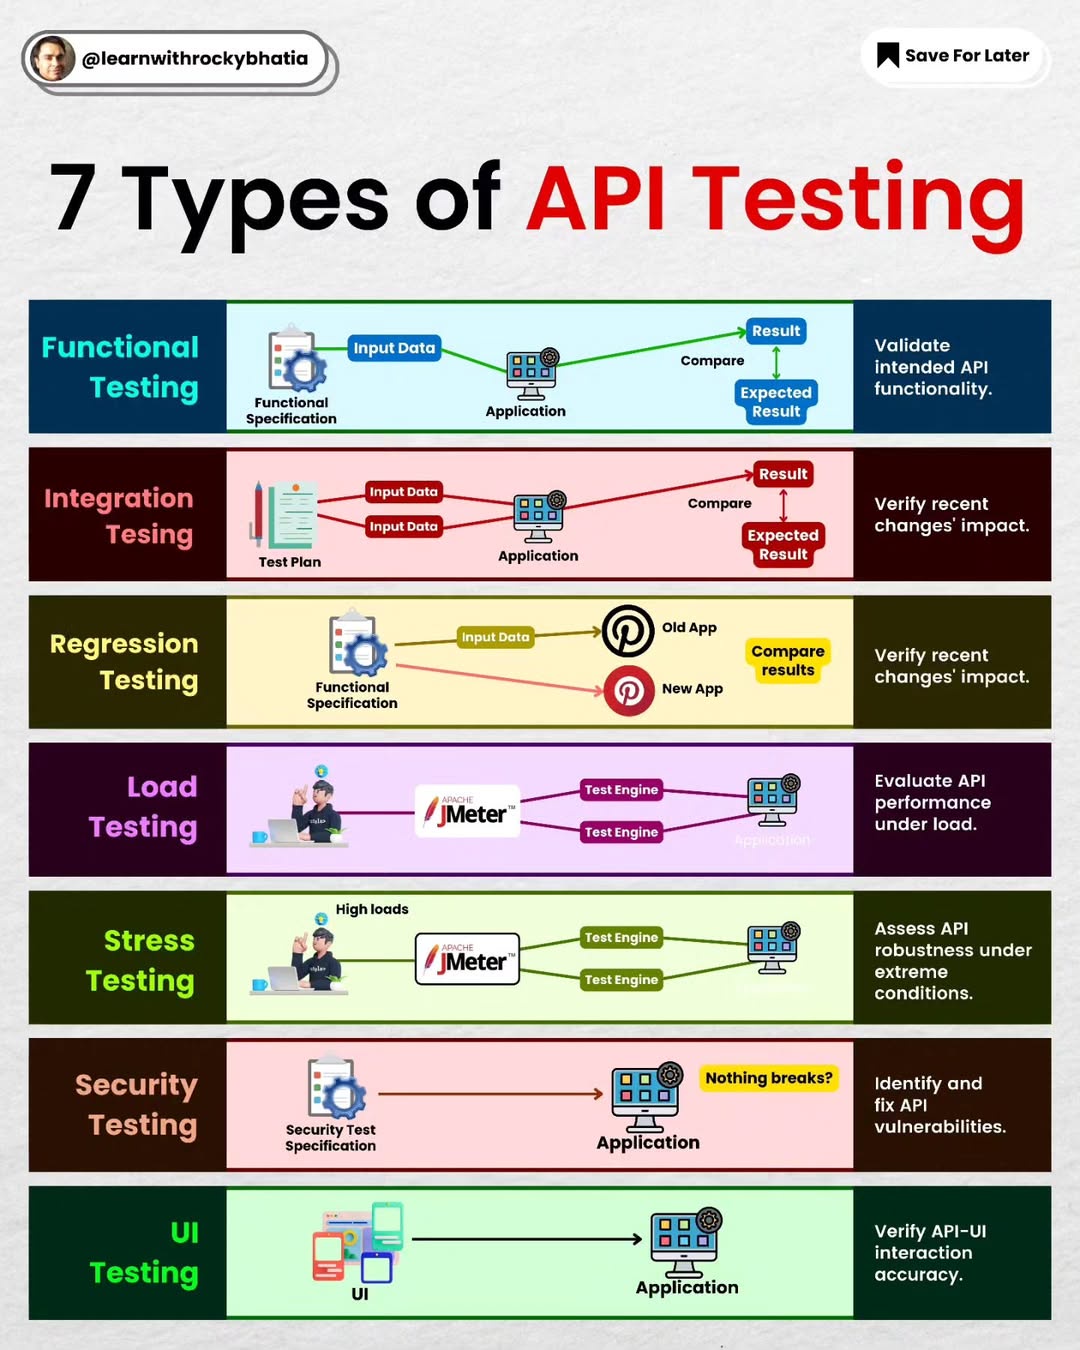
SOLID Principles
#solid #designprinciples #designpatterns #systemdesign
𝐒 – 𝐒𝐢𝐧𝐠𝐥𝐞 𝐑𝐞𝐬𝐩𝐨𝐧𝐬𝐢𝐛𝐢𝐥𝐢𝐭𝐲 𝐏𝐫𝐢𝐧𝐜𝐢𝐩𝐥𝐞 A class should have only one reason to change. - Example: Instead of one giant User class that handles authentication, profile updates, and sending emails, split it into UserAuth, UserProfile, and EmailService.
𝐎 – 𝐎𝐩𝐞𝐧/𝐂𝐥𝐨𝐬𝐞𝐝 𝐏𝐫𝐢𝐧𝐜𝐢𝐩𝐥𝐞 Classes should be open for extension but closed for modification. - Example: Define a Shape interface with an area() method. When you need a new shape, just add a Circle or Triangle class that implements it.
𝐋 – 𝐋𝐢𝐬𝐤𝐨𝐯 𝐒𝐮𝐛𝐬𝐭𝐢𝐭𝐮𝐭𝐢𝐨𝐧 𝐏𝐫𝐢𝐧𝐜𝐢𝐩𝐥𝐞 Subtypes must be substitutable for their base types without breaking behavior. - Example: If Bird has a fly() method, then Eagle and Sparrow should both work anywhere a Bird is expected.
𝐈 – 𝐈𝐧𝐭𝐞𝐫𝐟𝐚𝐜𝐞 𝐒𝐞𝐠𝐫𝐞𝐠𝐚𝐭𝐢𝐨𝐧 𝐏𝐫𝐢𝐧𝐜𝐢𝐩𝐥𝐞 Don't force classes to implement interfaces they don't use. - Example: Instead of one fat Machine interface with print(), scan(), and fax(), break it into Printable, Scannable, and Faxable. A SimplePrinter only implements Printable.
𝐃 – 𝐃𝐞𝐩𝐞𝐧𝐝𝐞𝐧𝐜𝐲 𝐈𝐧𝐯𝐞𝐫𝐬𝐢𝐨𝐧 𝐏𝐫𝐢𝐧𝐜𝐢𝐩𝐥𝐞 High-level modules should not depend on low-level modules. Both should depend on abstractions. - Example: Your OrderService should depend on a PaymentGateway interface, not directly on Stripe or PayPal.
The real power of SOLID is not in following each principle in isolation. It's in how they work together to make your code easier to change, test, and extend.
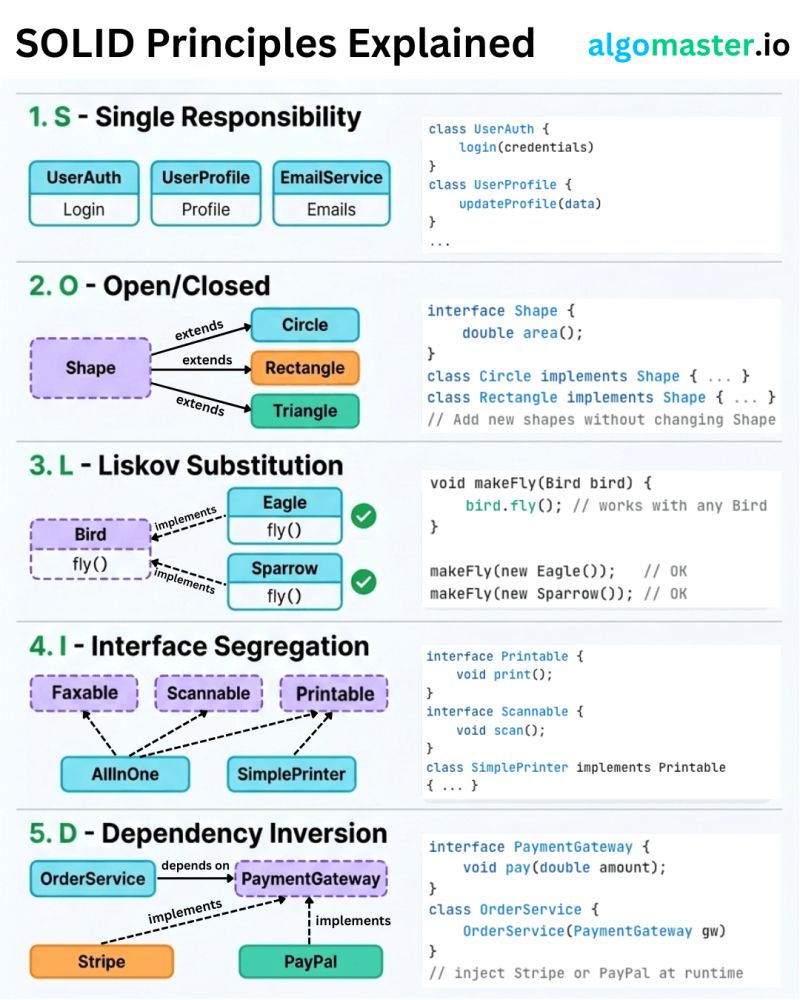
12 Essential Programmer Concepts
#programmingconcepts #systemdesign #security #coding #datastructures #algorithms #networking #versioncontrol #git #databases #api #agile
These comprehensive set of concepts forms a strong foundation for programmers, covering a range of skills from programming fundamentals to system design and security considerations.
1. Introduction to Programming Languages: A foundational understanding of at least one programming language (e.g., Python, Java, C++), enabling the ability to comprehend and switch between languages as needed.
2. Data Structures Mastery: Proficiency in fundamental data structures such as arrays, linked lists, stacks, queues, trees, and graphs, essential for effective algorithmic problem solving.
3. Algorithms Proficiency: Familiarity with common algorithms and problem solving techniques, including sorting, searching, and dynamic programming, to optimise code efficiency. ** 4. Database Systems Knowledge:** Understanding of database systems, covering relational databases (e.g., SQL) and NoSQL databases (e.g., MongoDB), crucial for efficient data storage and retrieval.
5. Version Control Mastery: Proficiency with version control systems like Git, encompassing skills in branching, merging, and collaboration workflows for effective team development.
6. Agile Methodology Understanding: Knowledge of the Agile Software Development Life Cycle (Agile SDLC) principles, emphasizing iterative development, Scrum, and Kanban for adaptable project management.
7. Web Development Basics (Networking): Fundamental understanding of networking concepts, including protocols, IP addressing, and HTTP, essential for web development and communication between systems.
8. APIs (Application Programming Interfaces) Expertise: Understanding how to use and create APIs, critical for integrating different software systems and enabling seamless communication between applications.
9. Testing and Debugging Skills: Proficiency in testing methodologies, unit testing, and debugging techniques to ensure code quality and identify and fix errors effectively.
10. Design Patterns Familiarity: Knowledge of common design patterns in object-oriented programming, aiding in solving recurring design problems and enhancing code maintainability.
11. System Design Principles: Understanding of system design, including architectural patterns, scalability, and reliability, to create robust and efficient software systems.
12. Security Awareness: Fundamental knowledge of security principles, including encryption, authentication, and best practices for securing applications and data.
Other areas could be OS, containers, concurrency and parallelism , basic web development etc.
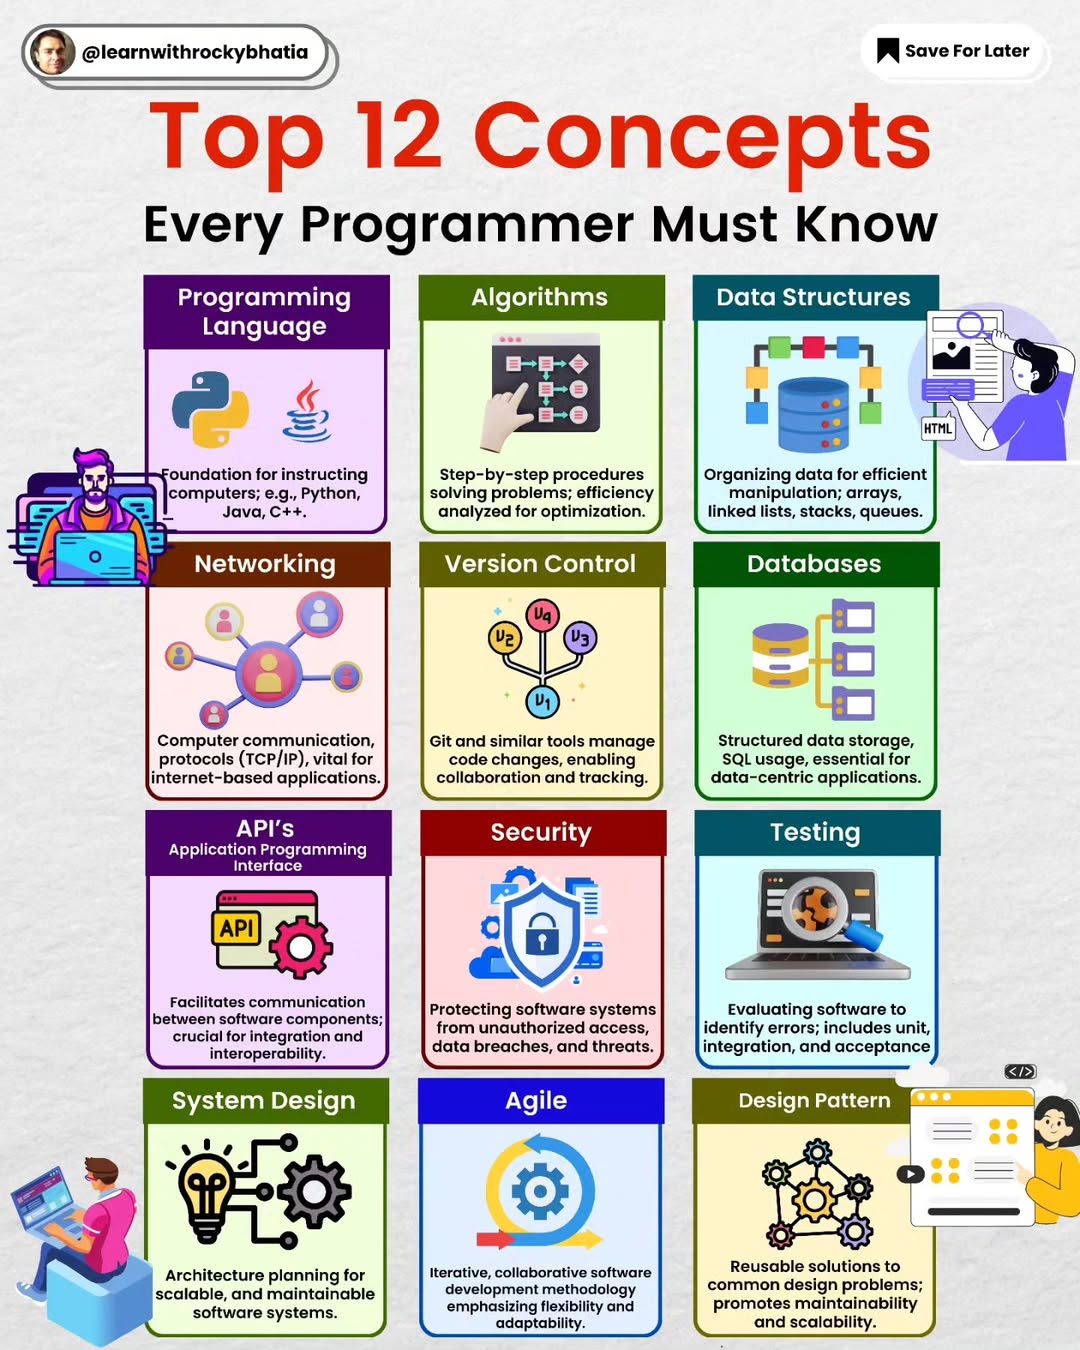
API Architectural Styles
#api #architecturalstyles #soap #rest #graphql #grpc #websocket #webhook
𝐓𝐨𝐩 𝟔 𝐀𝐏𝐈 𝐚𝐫𝐜𝐡𝐢𝐭𝐞𝐜𝐭𝐮𝐫𝐞 𝐒𝐭𝐲𝐥𝐞𝐬
APIs serve as the backbone of modern software development, enabling seamless integration and communication between various components. Understanding the different API architecture styles is crucial for choosing the most suitable approach for your project. Below are the top six API architecture styles along with their recommended use cases:
1️⃣ SOAP (Simple Object Access Protocol): SOAP is ideal for enterprise-level applications that require a standardized protocol for exchanging structured information. Its robust features include strong typing and advanced security mechanisms, making it suitable for complex and regulated environments.
2️⃣ RESTful (Representational State Transfer): RESTful APIs prioritize simplicity and scalability, making them well-suited for web services, particularly those catering to public-facing applications. With a stateless, resource-oriented design, RESTful APIs facilitate efficient communication between clients and servers.
3️⃣ GraphQL: GraphQL shines in scenarios where flexibility and client-driven data retrieval are paramount. By allowing clients to specify the exact data they need, GraphQL minimizes over-fetching and under-fetching, resulting in optimized performance and reduced network traffic.
4️⃣ gRPC: For high-performance, low-latency communication, gRPC emerges as the preferred choice. Widely adopted in microservices architectures, gRPC offers efficient data serialization and bi-directional streaming capabilities, making it suitable for real-time applications and distributed systems.
5️⃣ WebSockets: WebSockets excel in applications requiring real-time, bidirectional communication, such as chat platforms and online gaming. By establishing a persistent connection between clients and servers, WebSockets enable instant data updates and seamless interaction experiences.
6️⃣ Webhooks: In event-driven systems, webhooks play a vital role by allowing applications to react to specific events in real-time. Whether it's notifying about data updates or triggering actions based on user activities, webhooks facilitate seamless integration and automation.
Selecting the appropriate API style is crucial for optimising your application's performance and enhancing user experience. By understanding the strengths and use cases of each architecture style, you can make informed decisions that align with your project's specific requirements.
Good Code Principles
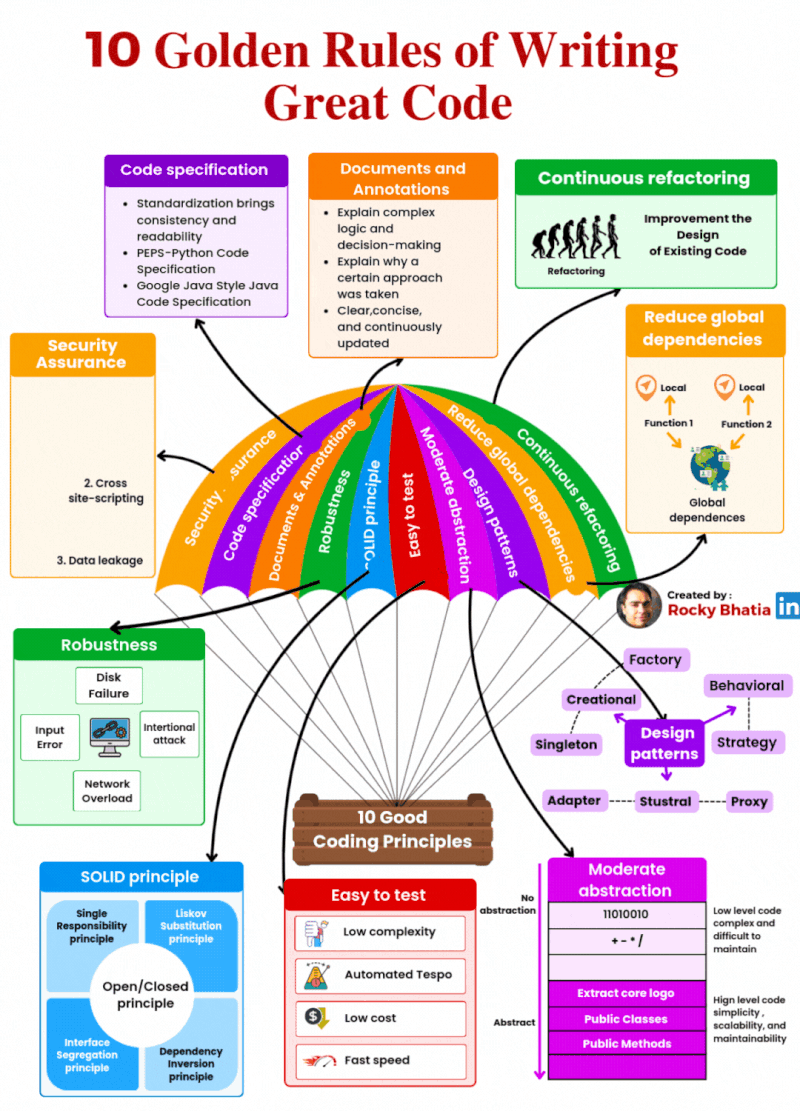
#cleancode #goodcode #coding #principles
It’s not just about writing code that works.
It’s about writing code that is robust, secure, maintainable, scalable, and testable.
Here are the 10 Best Coding Principles every developer should embrace:
1️⃣ Code Specification – Follow standards like PEP8 or Google Java Style to ensure readability. 2️⃣ Clear Documentation & Annotations – Explain the why, not just the what. 3️⃣ Security Assurance – Code defensively to avoid data leaks and cross-site scripting. 4️⃣ Robustness – Build for failures like input errors, disk issues, or network overload. 5️⃣ SOLID Principles – The foundational pillars of clean object-oriented design. 6️⃣ Easy to Test – Low complexity, low cost, and high speed testing wins. 7️⃣ Moderate Abstraction – Not too raw, not too abstract. Just enough to simplify. 8️⃣ Design Patterns – Use patterns like Factory, Singleton, Strategy, etc. wisely. 9️⃣ Reduce Global Dependencies – Keep your code modular and loosely coupled. 🔟 Continuous Refactoring – Improve design continuously without breaking functionality.
SQL CheatSheet
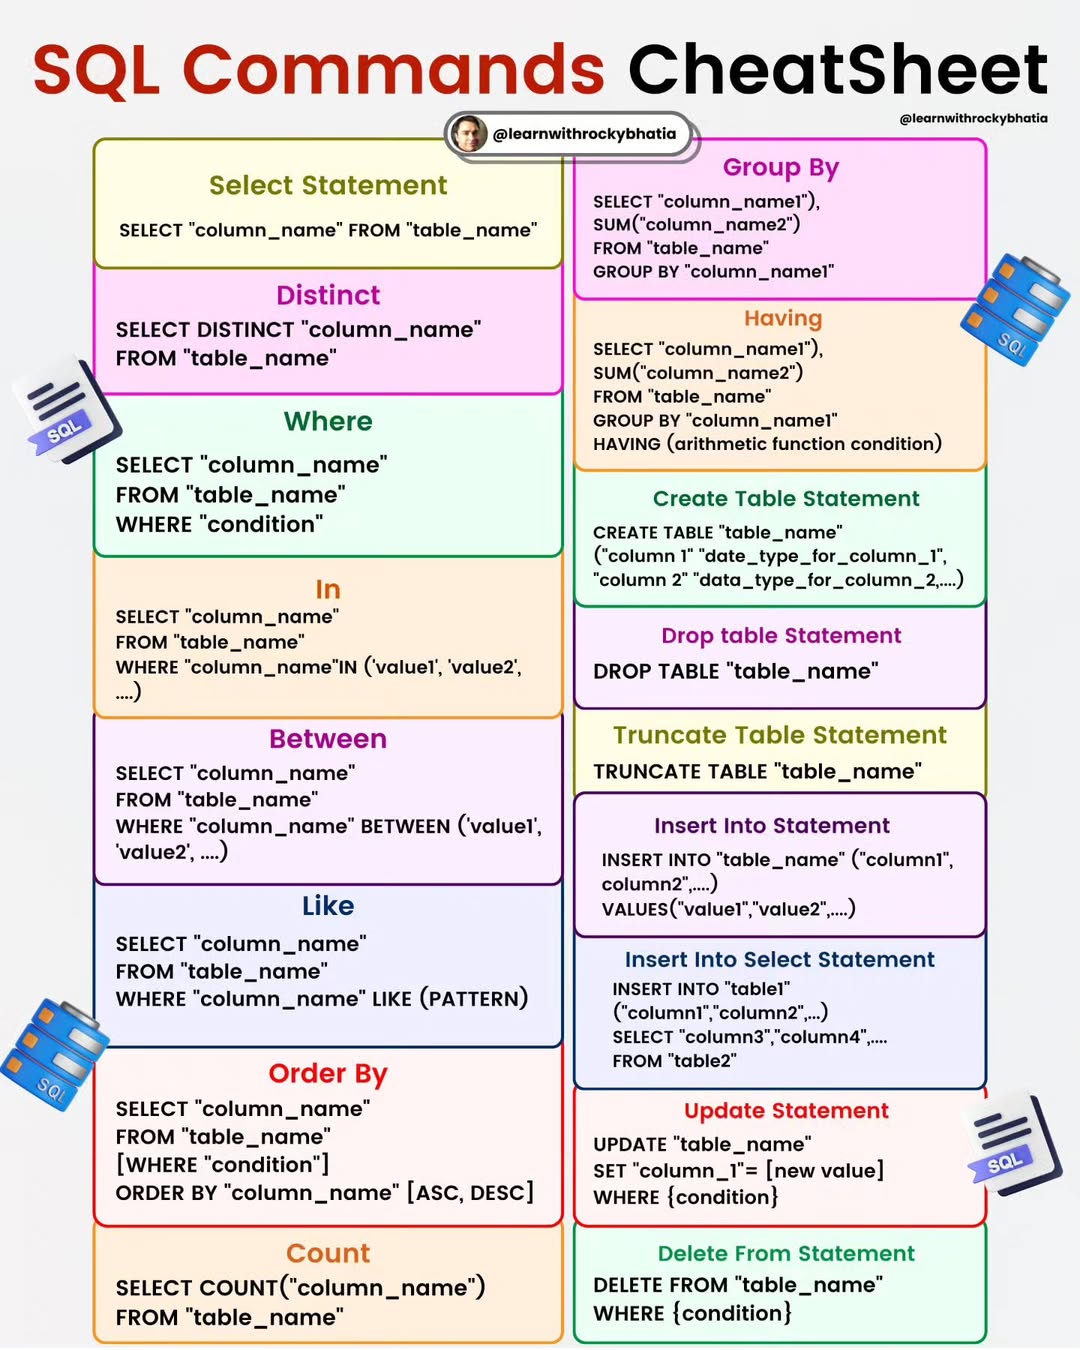
To embark on your journey into the realm of SQL mastery, Please follow following guide:
- Understand what databases are and how they store and organise data.
- Learn about the difference between relational databases and other types of databases. - Familiarise yourself with the basic syntax of SQL queries. -Learn how to use SQL to retrieve data from a database using the SELECT statement.
- Explore different clauses like WHERE, ORDER BY, GROUP BY, and HAVING to filter, sort, and group data.
- Learn how to use aggregate functions like COUNT, SUM, AVG, MIN, and MAX.
- Understand how to use INSERT, UPDATE, and DELETE statements to modify data in a database.
- Learn about constraints and how to maintain data integrity.
- Study different types of joins (INNER JOIN, LEFT JOIN, RIGHT JOIN, FULL JOIN) to combine data from multiple tables.
- Learn about primary keys, foreign keys, and how to establish relationships between tables.
- Dive into subqueries and how they can be used within other queries.
- Learn about common table expressions (CTEs) for creating temporary result sets.
- Explore window functions for advanced data analysis.
- Understand more advanced DML concepts like MERGE (UPSERT) statements.
- Learn about transactions and how to manage them using BEGIN, COMMIT, and ROLLBACK.
- Learn about creating, altering, and dropping tables using DDL statements.
- Explore data types, constraints, and indexes.
Remember that learning SQL is an ongoing process. Practice is key, so work on real-world examples and projects to solidify your skills.
Docker
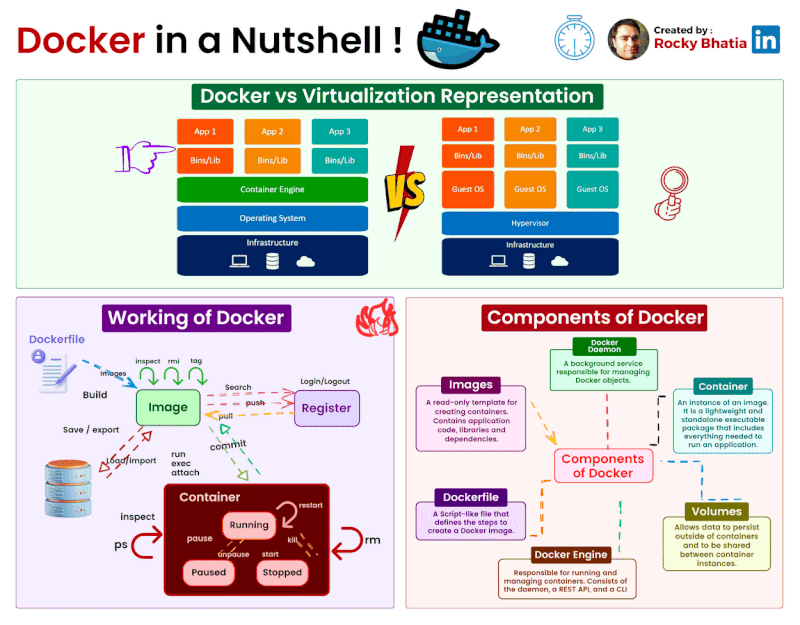
In today's software world, Docker and containers are like secret weapons, making complex things easy and driving innovation.
Think of Docker like a well-organised kitchen where everything has a role:
Docker Image: It's like a recipe card for an app. It lists all the ingredients and steps, just like cooking. Docker images start with a base and get customised.
Docker Container: Containers are like baking pans . Each holds a part of your app, separate yet self-sufficient. You can run multiple containers side by side, like baking several cakes at once.
Docker Registry: Docker registries are like libraries 📚 filled with recipes. It's where you find pre-made recipes (images) or add your own to the collection.
Docker Engine: Meet the tech chef , Docker Engine. It makes sure everything runs smoothly, just like a chef running a kitchen.
Dockerfile: Think of Dockerfiles as cooking guides 🧑🍳. Each line is an instruction, like a recipe. Building images is like cooking – each step adds to the final result.
Docker Swarm & Kubernetes: These are like teams 🎉 at a big event. They manage different tasks, making sure everything runs smoothly, like a well-coordinated crew.
Data Structures & Algorithms
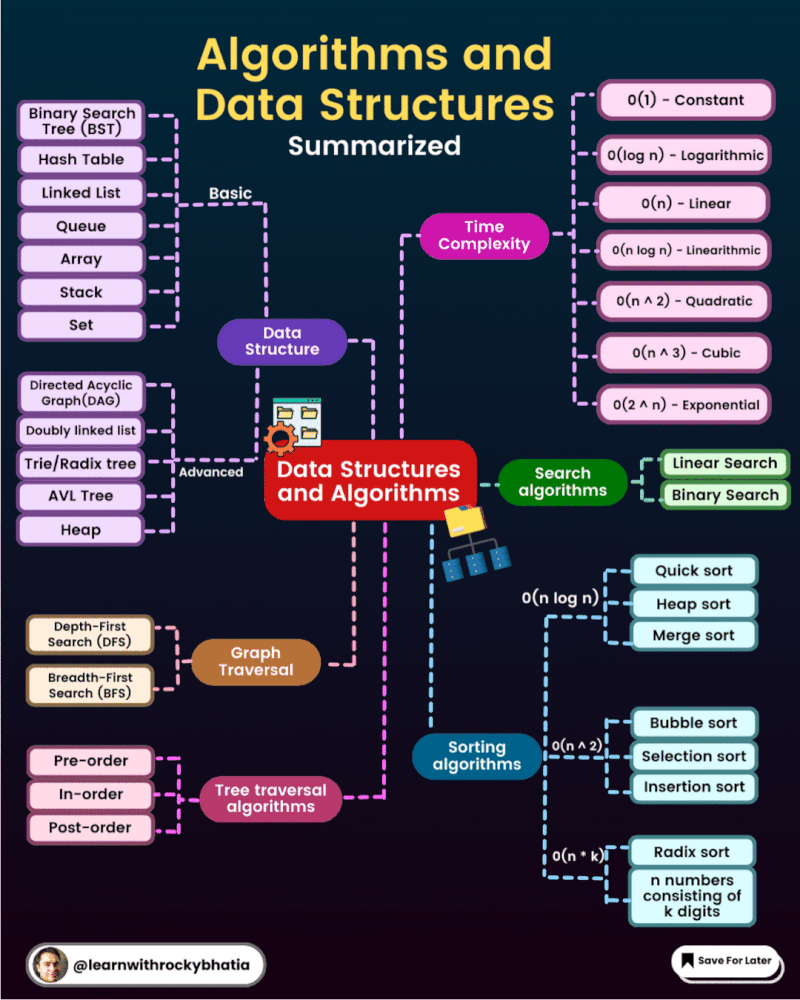
Data Structures and Algorithms
Primitive Data Structures
• Integers • Floating-point numbers • Characters • Boolean values
Non-Primitive Data Structures
• Arrays: Fixed-size sequence of elements, efficient for random access but inefficient for insertions/deletions. • Linked Lists: Dynamic structure of nodes linked by pointers, efficient for insertions/deletions at any position but slower random access. • Stacks: LIFO (Last-In-First-Out) order, used for function calls and expression evaluation. • Queues: FIFO (First-In-First-Out) order, used for scheduling and task management. • Trees: Hierarchical structures with a root node, used for representing hierarchical relationships (e.g., binary trees, n-ary trees). • Graphs: Collections of nodes (vertices) connected by edges, used for representing networks and relationships. • Hash Tables: Data structures that use hashing to store and retrieve data efficiently, often used for implementing dictionaries and databases.
Choosing the right data structure depends on factors such as:
• Data type and volume • Required operations (insertion, deletion, search, etc.) • Memory usage • Efficiency considerations
OOP Principles
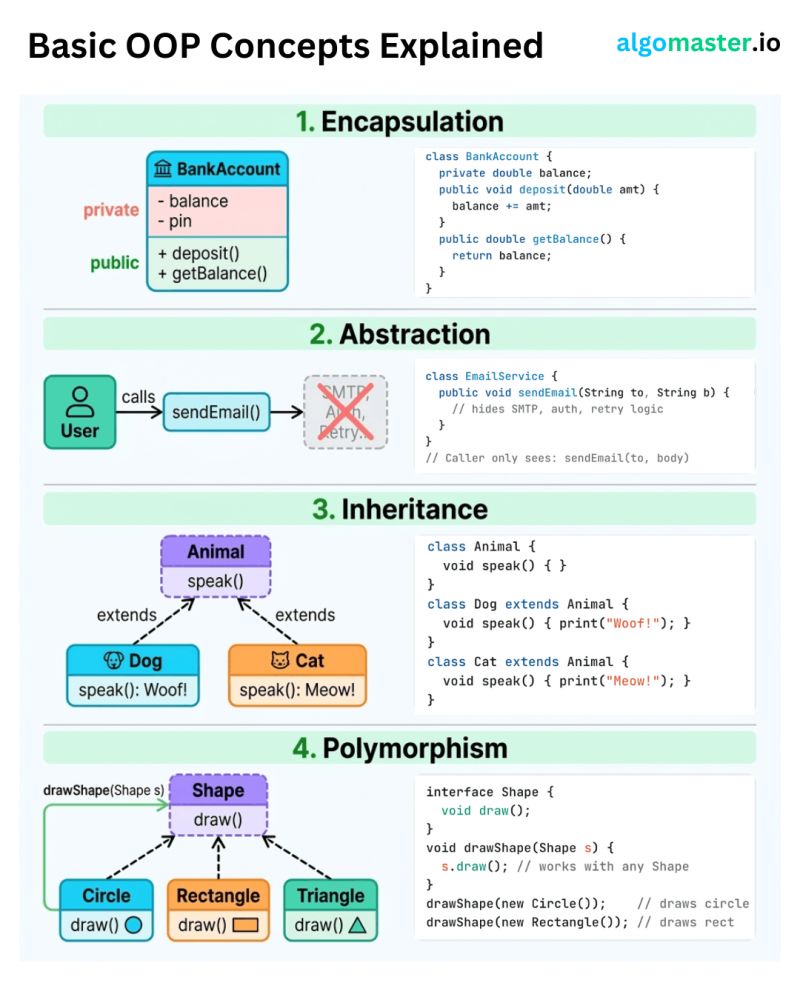
#oop #objectorientedprinciples
Basic OOP Concepts Explained with Clear Examples:
1. 𝐄𝐧𝐜𝐚𝐩𝐬𝐮𝐥𝐚𝐭𝐢𝐨𝐧 Hide internal data behind public methods. - Example: A BankAccount class keeps balance and pin private. The only way to interact with it is through deposit() and getBalance().
2. 𝐀𝐛𝐬𝐭𝐫𝐚𝐜𝐭𝐢𝐨𝐧 Expose a simple interface, hide the complexity behind it. - Example: An EmailService class gives you sendEmail(to, body). Internally, it handles SMTP connections, authentication, and retry logic. The caller doesn't need to know any of that. They just call one method and it works.
3. 𝐈𝐧𝐡𝐞𝐫𝐢𝐭𝐚𝐧𝐜𝐞 Let child classes reuse and override behavior from a parent class. - Example: An Animal class defines speak(). Dog extends it and returns “Woof!”, Cat extends it and returns “Meow!”. Shared logic lives in one place, and each subclass customizes what it needs.
4. 𝐏𝐨𝐥𝐲𝐦𝐨𝐫𝐩𝐡𝐢𝐬𝐦 Write code that works with multiple types through a common interface. - Example: Define a Shape interface with a draw() method. Now Circle, Rectangle, and Triangle each implement draw() their own way. A single drawShape(Shape s) method works with all of them.