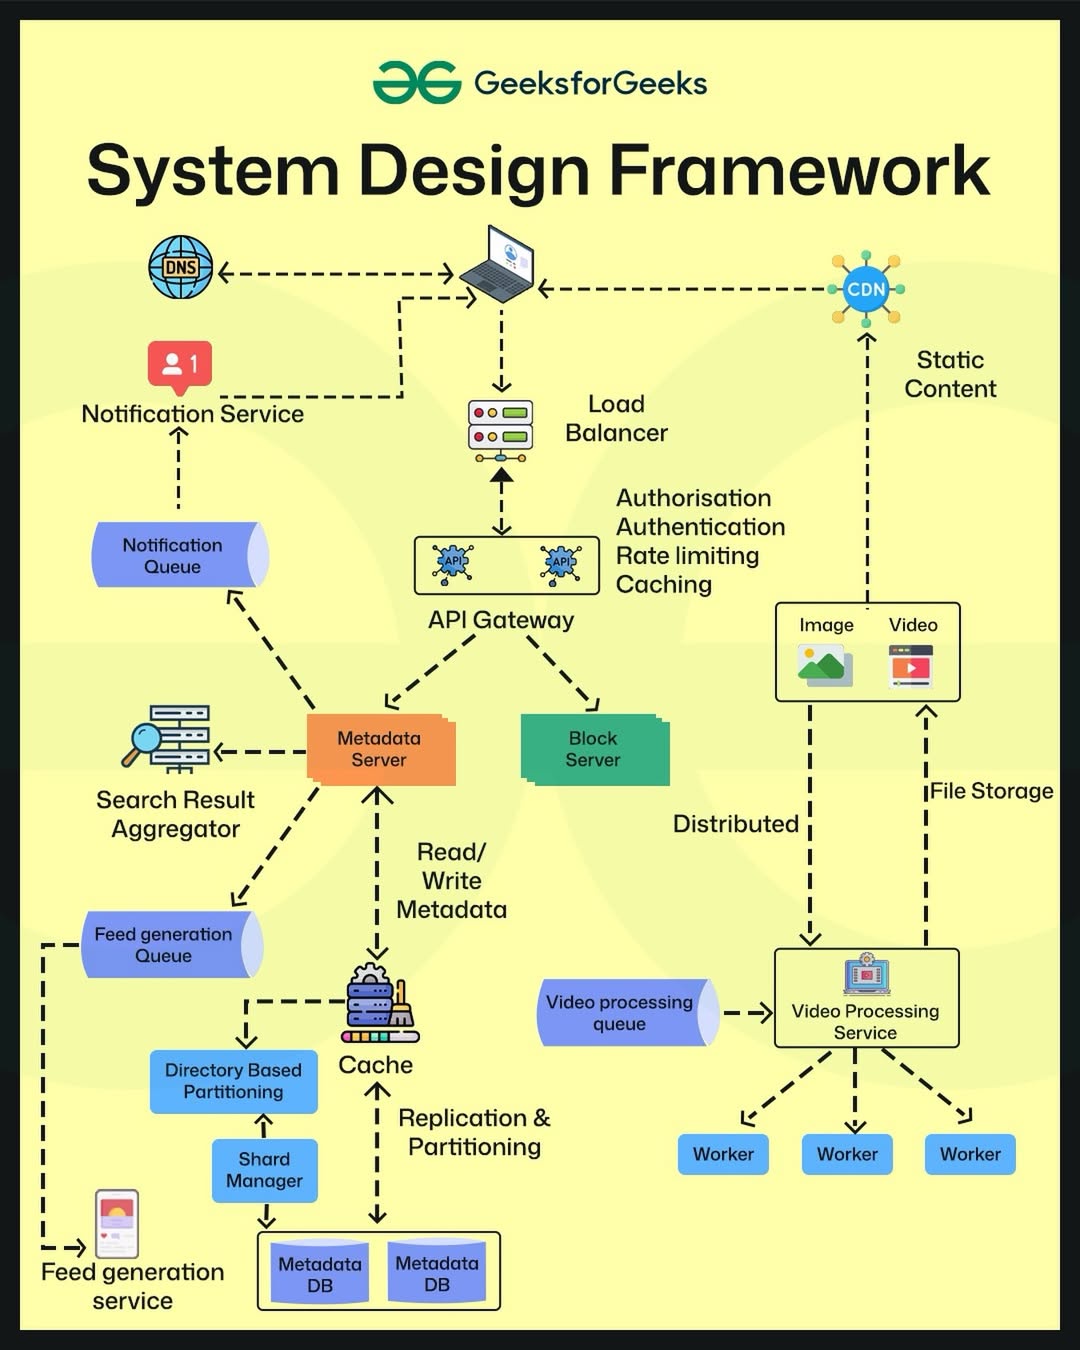
System Design Framework
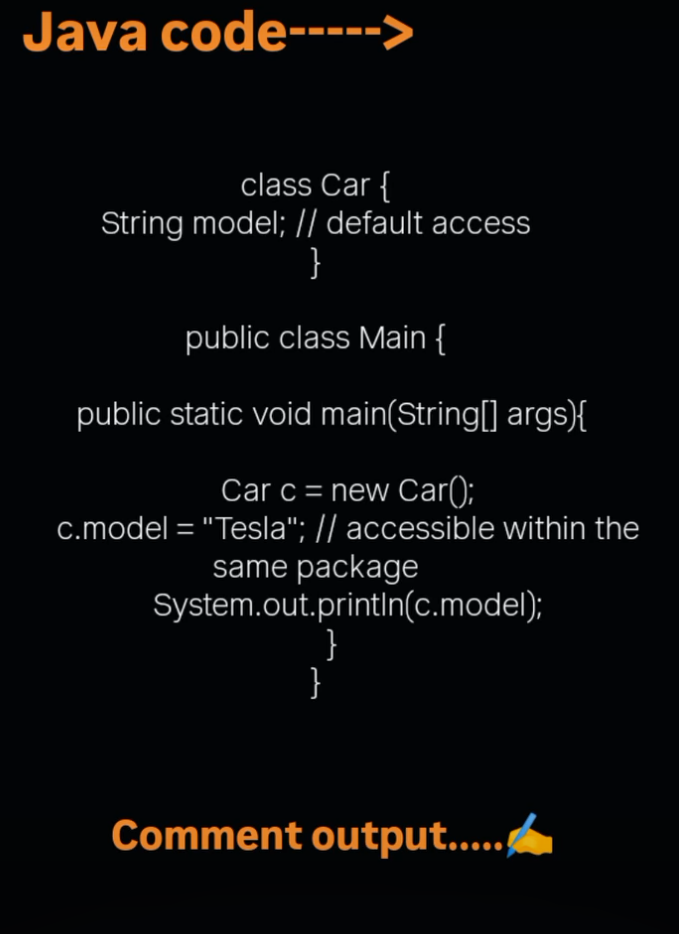
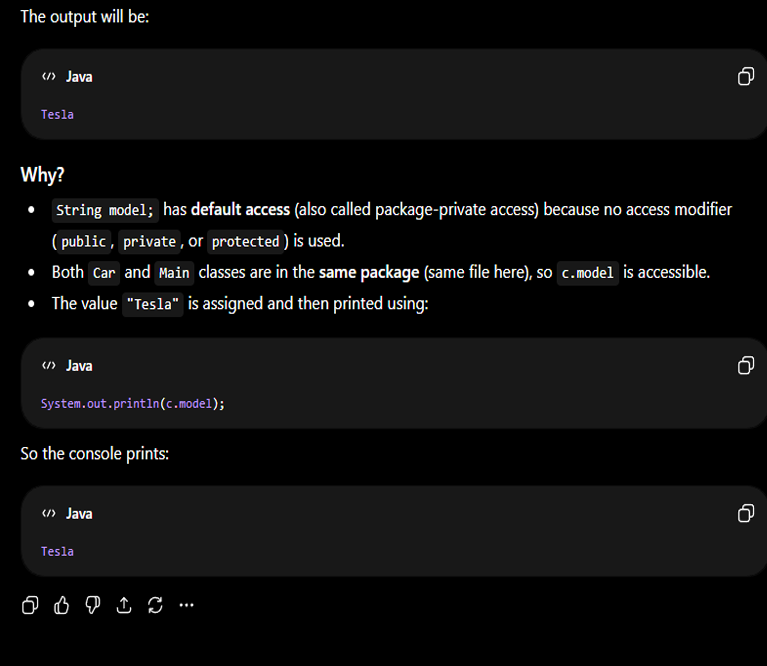
Java Test
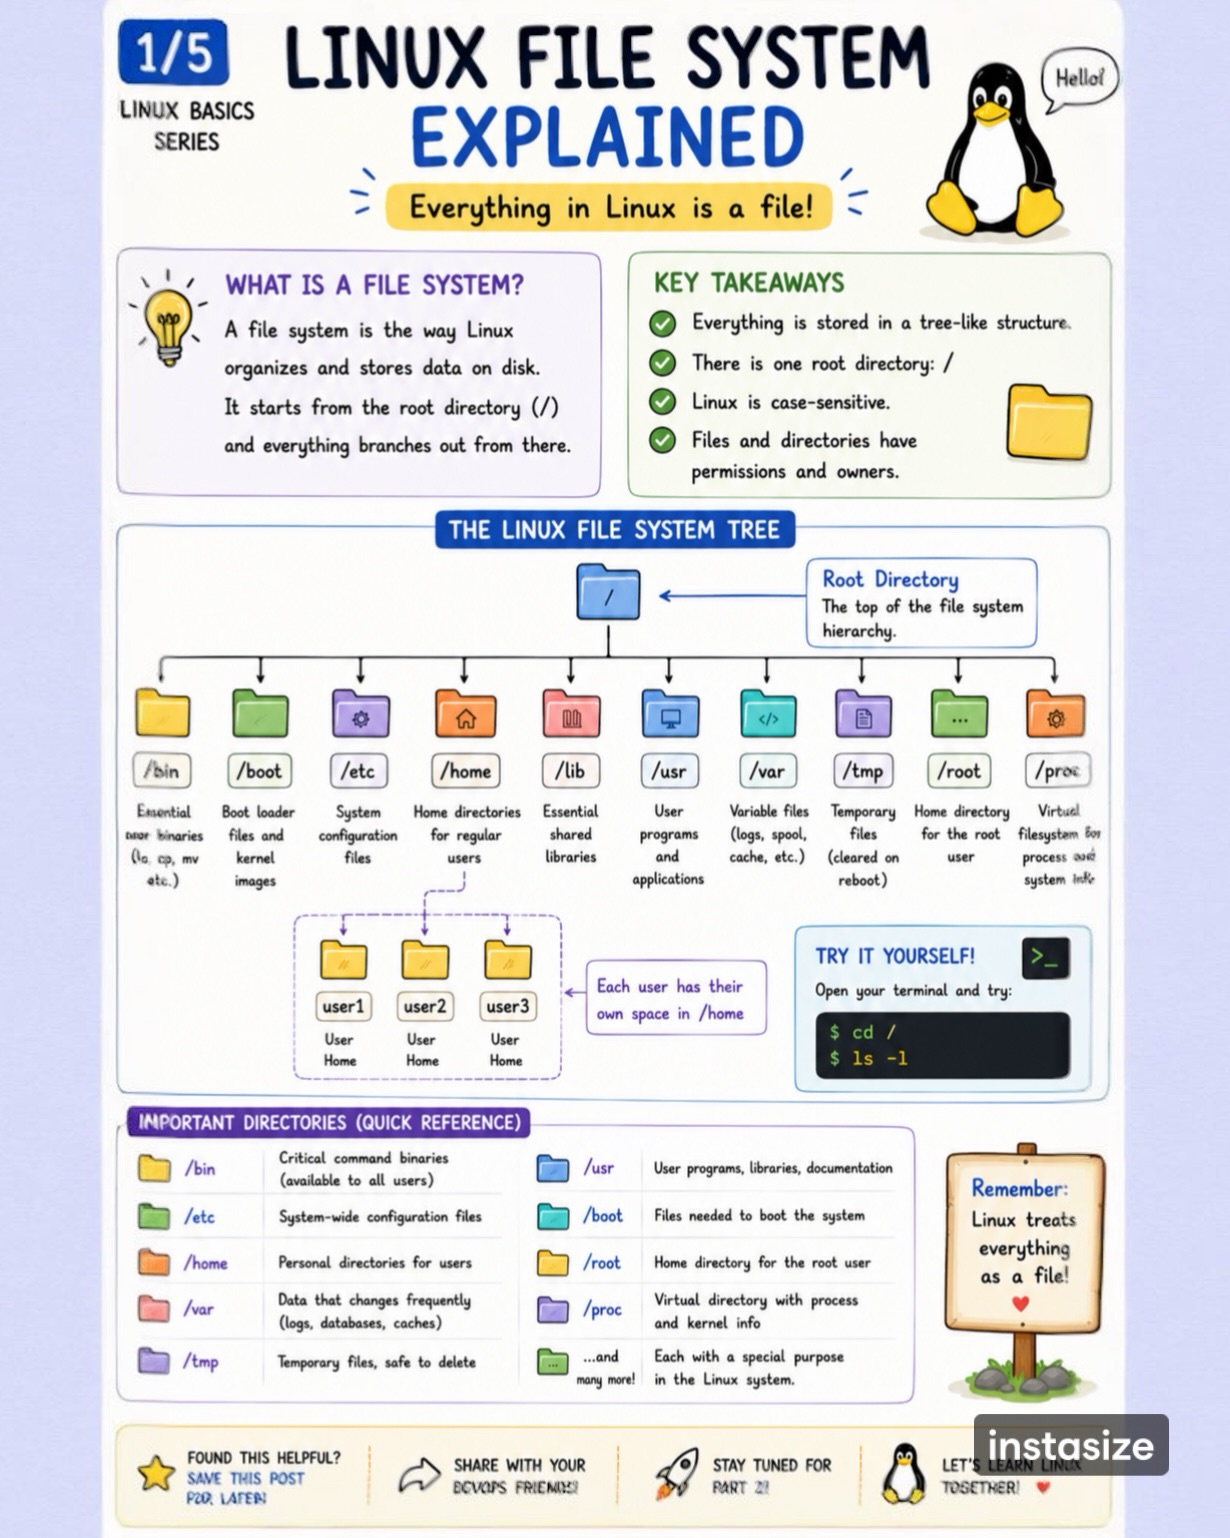
Linux File System Explained
How Databases Work
Java Full Stack Developer in 2026

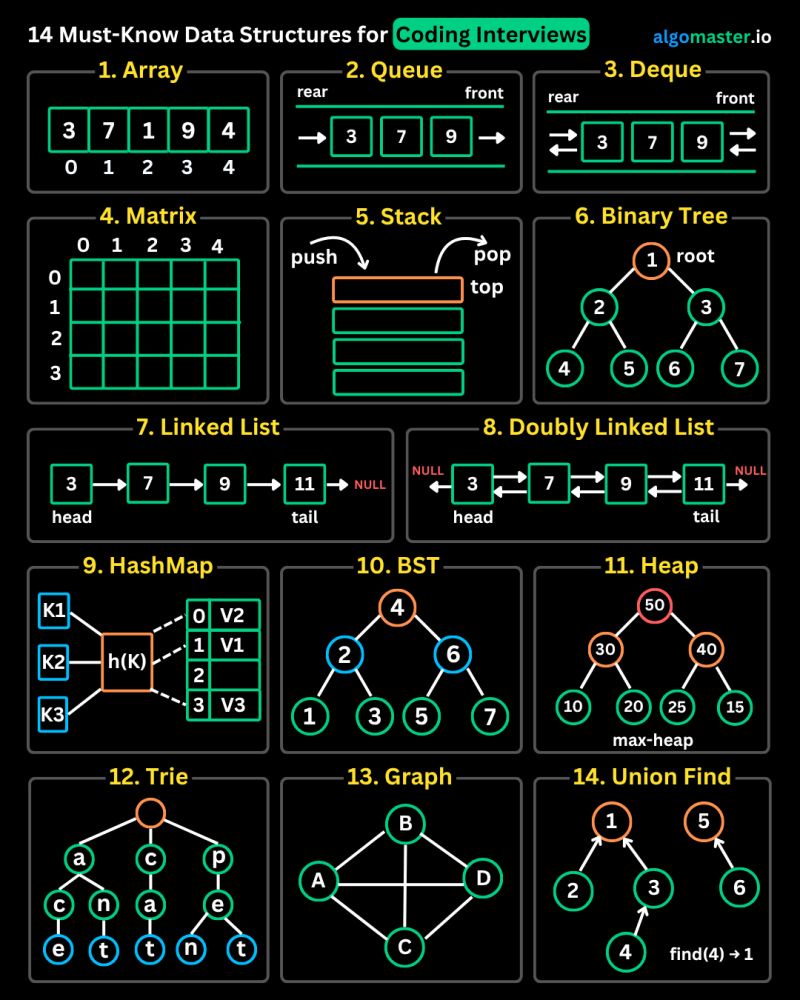
Must Know Data Structures
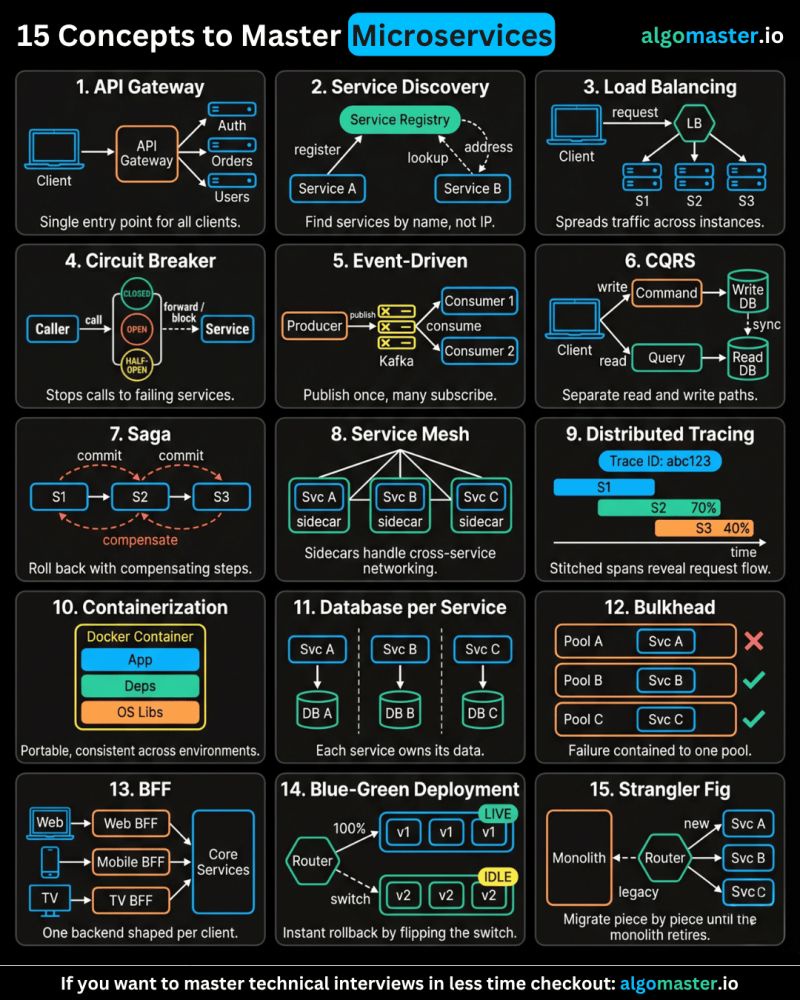
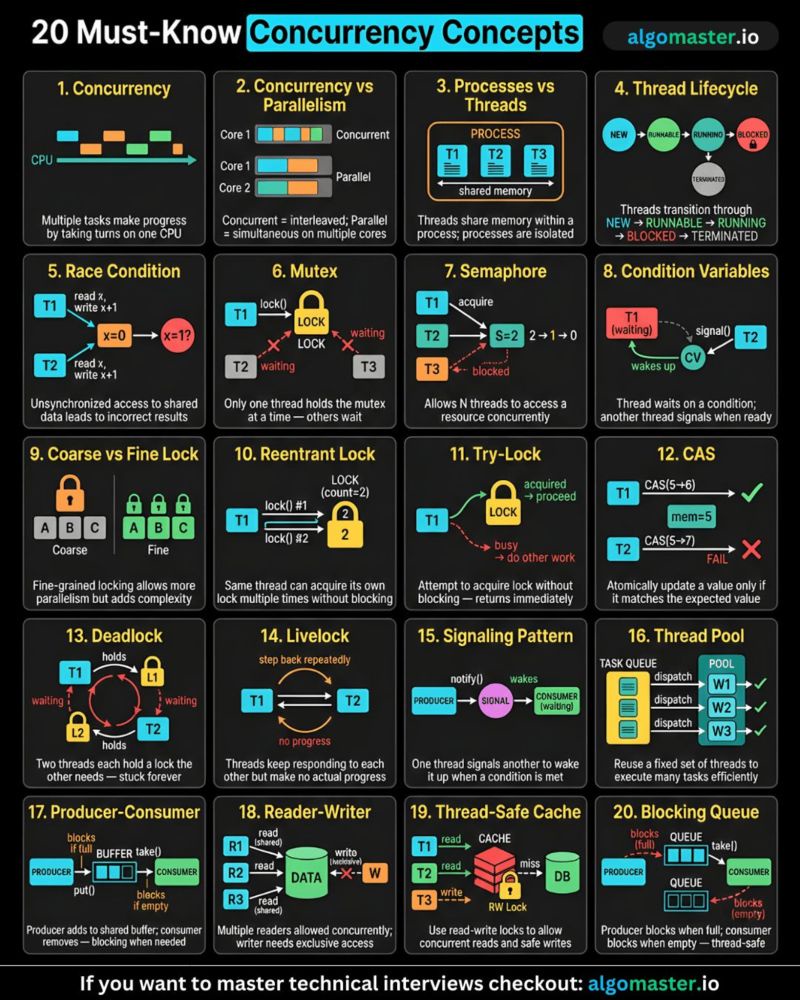
Concurrency Concepts
🧠 Why this matters more than you think Concurrency is not just theory. 👉 It shows up in: ⚡ Backend systems ⚡ Distributed systems ⚡ Real-world bugs (race conditions, deadlocks) ⚡ Performance optimization
And in interviews, it’s often the difference between “good” and “hire” 🔑 The 4 layers you should understand (instead of memorizing 20 items) ⚙️ Foundations 👉 Concurrency vs Parallelism 👉 Processes vs Threads 👉 Thread Lifecycle
If you don’t get this, everything else feels random. ⚠️ Problems (where most bugs live) 👉 Race Conditions 👉 Deadlocks 👉 Livelocks These are interview gold. Explain them well → instant signal of experience.
🔒 Control mechanisms 👉 Mutex 👉 Semaphores 👉 Condition Variables 👉 CAS (Compare-And-Swap) This is how you fix the above problems.
🧩 Patterns (what real systems use) 👉 Producer-Consumer 👉 Thread Pool 👉 Reader-Writer 👉 Blocking Queue 👉 Thread-safe Cache This is where theory meets system design.
🎯 How to actually study this (practical path) Don’t just read definitions. 👉 Step 1: Understand the problem (e.g., race condition) 👉 Step 2: Learn the primitive (mutex, semaphore) 👉 Step 3: See it in a pattern (producer-consumer) That’s how it sticks.
🎥 Must read resources (shared by Aashish) If you want to master concurrency and multi-threading interviews, go through these:
Concurrency Overview: https://lnkd.in/gbXNtx8i Concurrency vs Parallelism: https://lnkd.in/ggm3zxKi Processes vs Threads: https://lnkd.in/gjD7BE9D Thread Lifecycle: https://lnkd.in/gnraugyb Race Conditions: https://lnkd.in/gJBaBWa5 Mutex: https://lnkd.in/gU-6SvJh Semaphores: https://lnkd.in/gpcMAvvC Condition Variables: https://lnkd.in/gzD3RdWy Coarse vs Fine Locking: https://lnkd.in/giHCvjbK Reentrant Locks: https://lnkd.in/gjjtEZrm Try-Lock: https://lnkd.in/gc9Frvik CAS: https://lnkd.in/gzzvSW_W Deadlock: https://lnkd.in/gKtDZ9gD Livelock: https://lnkd.in/g8UTb86c Signaling Pattern: https://lnkd.in/gg8RxZBf Thread Pool: https://lnkd.in/g52TJUT3 Producer-Consumer: https://lnkd.in/g9P_Rh-6 Reader-Writer: https://lnkd.in/geAvZkRy Thread-safe Cache: https://lnkd.in/gPW9JnkH Blocking Queue: https://lnkd.in/gtKrDJiE
📚 One book that will change your understanding 👉 “Java Concurrency in Practice” – Brian Goetz
Even if you don’t use Java, this book builds rock-solid fundamentals.
💡 Final takeaway You don’t need to memorize all 20. 👉 Understand the patterns 👉 Know when things break 👉 Know how to fix them That’s what interviews are really testing.
This is the kind of resource you revisit again and again.
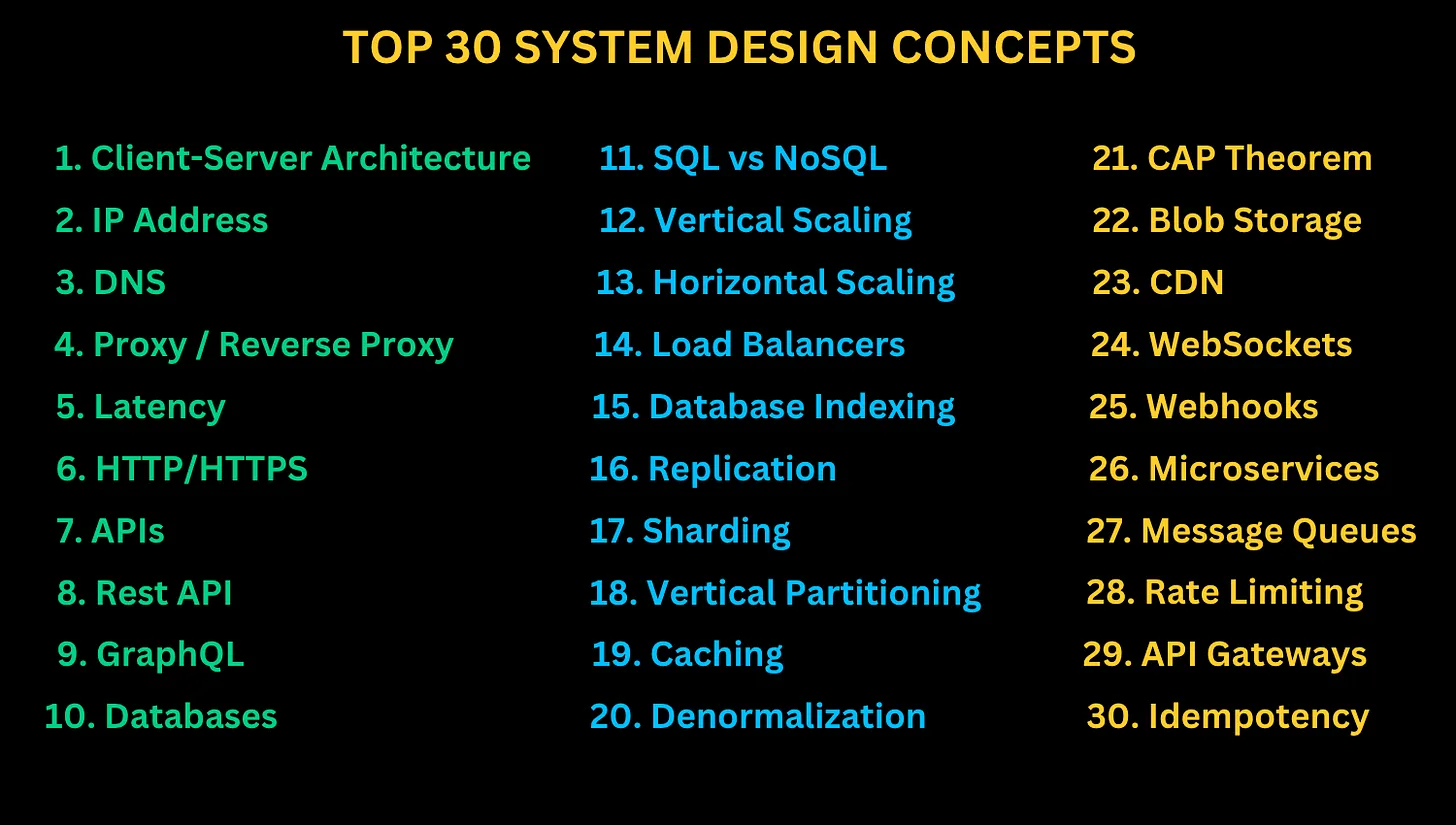
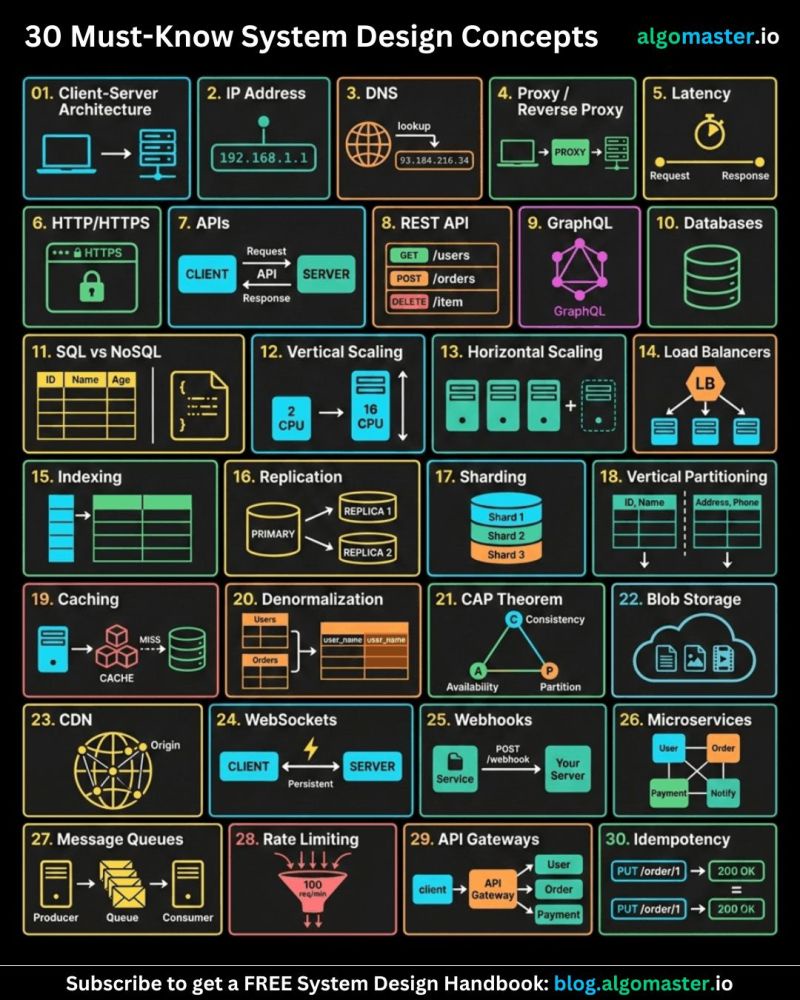
30 System Design Concepts
#system #systemdesign #designconcepts #explainwithcode
Please Note: This article is free to share – but still, all credit and copyright remains with Ashish Pratap Singh
https://blog.algomaster.io/p/30-system-design-concepts
Please checkout, sign up, subscribe and support all the excellent work Ashish has created for this excellent content in among other superb excellent posts. I am merely forwarding this content; all work belongs to Ashish.
”I also recently created a 20-minute YouTube video that quickly walks through all 30 concepts—packed with visuals and animations to make everything easier to understand.” **Ashish Pratap Singh
1. Client-Server Architecture**
Almost every web application that you use is built on this simple yet powerful concept called client-server architecture.

On one side, you have a client—this could be a web browser, a mobile app, or any other frontend application.
and on the other side, you have a server—a machine that runs continuously, waiting to handle incoming requests.
The client sends a request to store, retrieve, or modify data.
The server receives the request, processes it, performs the necessary operations, and sends back a response.
This sounds simple, but there’s a big question: How does the client even know where to find the server?
2. IP Address
A client doesn’t magically know where a server is, it needs an address to locate and communicate with it.
On the internet, computers identify each other using IP addresses, which work like phone numbers for servers.

Every publicly deployed server has a unique IP address. When a client wants to interact with a service, it must send requests to the correct IP address.
But there’s a problem:
- When we visit a website, we don’t type its IP address—we just enter the website name.
- We can’t expect users (or even systems) to memorize a string of random numbers for every service they connect to.
- And if we migrate our service to another server, its IP address may change—breaking all direct connections.
3. DNS
Instead of relying on hard-to-remember IP addresses, we use something much more human-friendly: domain names.
But, we need a way to map a domain name to it’s corresponding IP address.
This is where DNS (or Domain Name System) comes in. It maps easy to remember domain names (like algomaster.io) to their corresponding IP addresses.
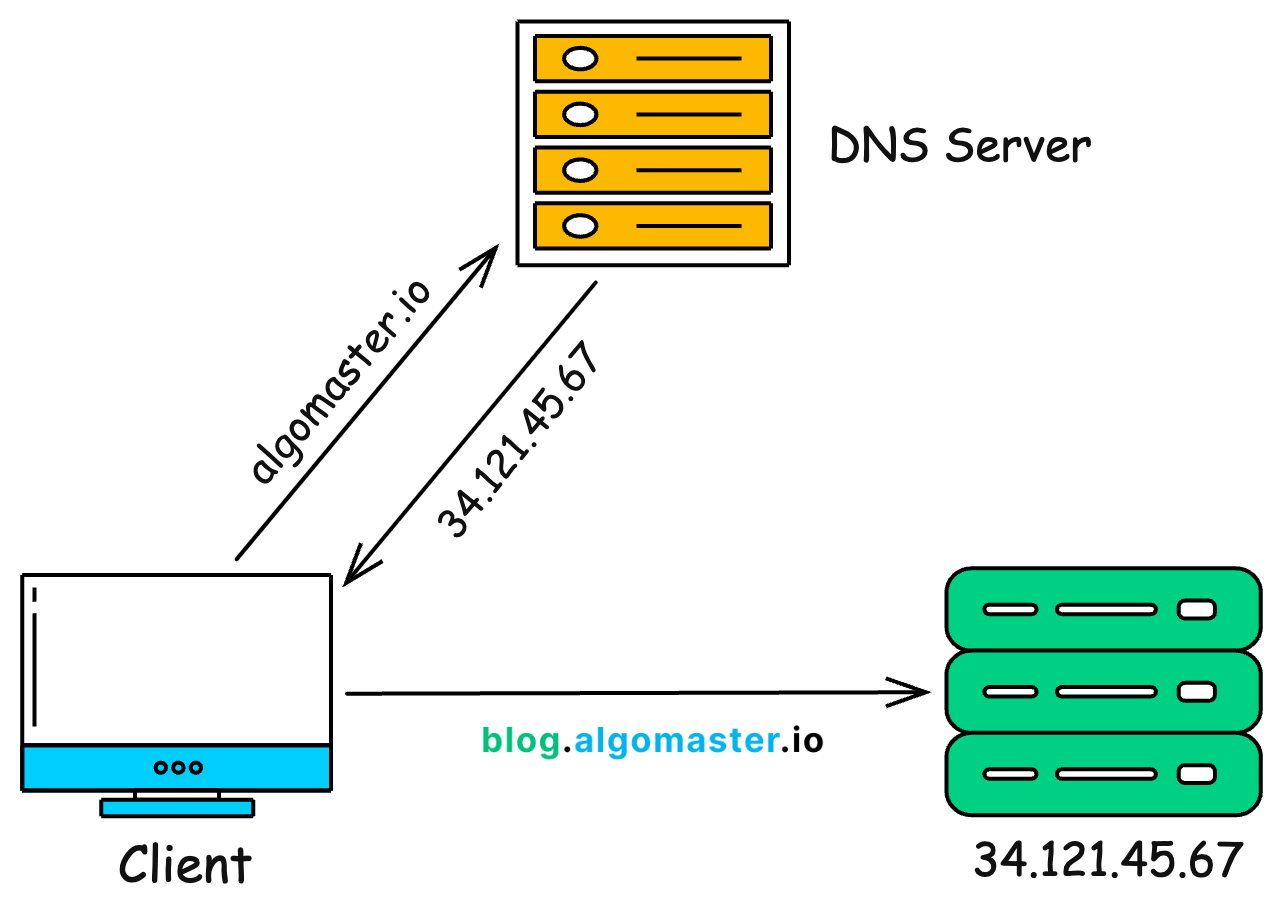
Here’s what happens behind the scenes:
When you type
algomaster.iointo your browser, your computer asks a DNS server for the corresponding IP address.Once the DNS server responds with the IP, your browser uses it to establish a connection with the server and make a request.
You can find the IP address of any domain using the ping command. Just open your terminal and type ping followed by the domain name. And it’ll return the IP address currently assigned to that domain.
4. Proxy / Reverse Proxy
When you visit a website, your request doesn’t always go directly to the server—sometimes, it passes through a proxy or reverse proxy first.
A proxy server acts as a middleman between your device and the internet.

When you request a webpage, the proxy forwards your request to the target server, retrieves the response, and sends it back to you.
Proxy hides your IP address, keeping your location and identity private.
A reverse proxy works the other way around. It intercepts client requests and forwards them to backend servers based on predefined rules.

Allowing direct access to servers can pose security risks, exposing them to threats like hackers and DDoS attacks.
A reverse proxy mitigates these risks by acting as a controlled entry point that regulates incoming traffic and hides server IPs.
It can also act as a load balancer, distributing traffic across multiple servers.
If you want to learn about Proxy vs Reverse Proxy in more detail, checkout this article:

5. Latency
Whenever a client communicates with a server, there’s always some delay. One of the biggest causes of this delay is physical distance.

For example, if our server is in New York, but a user in India sends a request, the data has to travel halfway across the world—and then the response has to make the same long trip back.
This round-trip delay is called latency—the total time it takes for data to travel between the client and the server. High latency can make applications feel slow and unresponsive.
One way to reduce latency is by deploying our service across multiple data centers worldwide.
This way, users can connect to the nearest server instead of waiting for data to travel across the globe.
Once a connection is made, how do clients and servers actually communicate?
6. HTTP/HTTPS
Every time you visit a website, your browser and the server communicate using a set of rules called HTTP (Hypertext Transfer Protocol).
That’s why most URLs start with http:// or its secure version, https://.

Here’s how it works:
- The client sends a request to the server. This request includes a header (containing details like the request type, browser type, and cookies) and sometimes a request body (which carries additional data, like form inputs).
- The server processes the request and responds with an HTTP response—either returning the requested data or an error message if something goes wrong.
HTTP has a major security flaw, it sends data in plain text. This is a serious problem, especially for sensitive information like passwords, credit card details, and personal data.
That’s why modern websites use HTTPS (Hypertext Transfer Protocol Secure) instead. HTTPS encrypts all data using SSL/TLS, ensuring that even if someone intercepts the request, they can’t read or alter it.
But clients and servers don’t directly exchange raw HTTP requests and response.
HTTP is just a protocol for transferring data but it doesn’t define:
- How requests should be structured
- What format responses should be in
- or how different clients should interact with the server.
This is where APIs (or Application Programming Interfaces) come in.
7. APIs
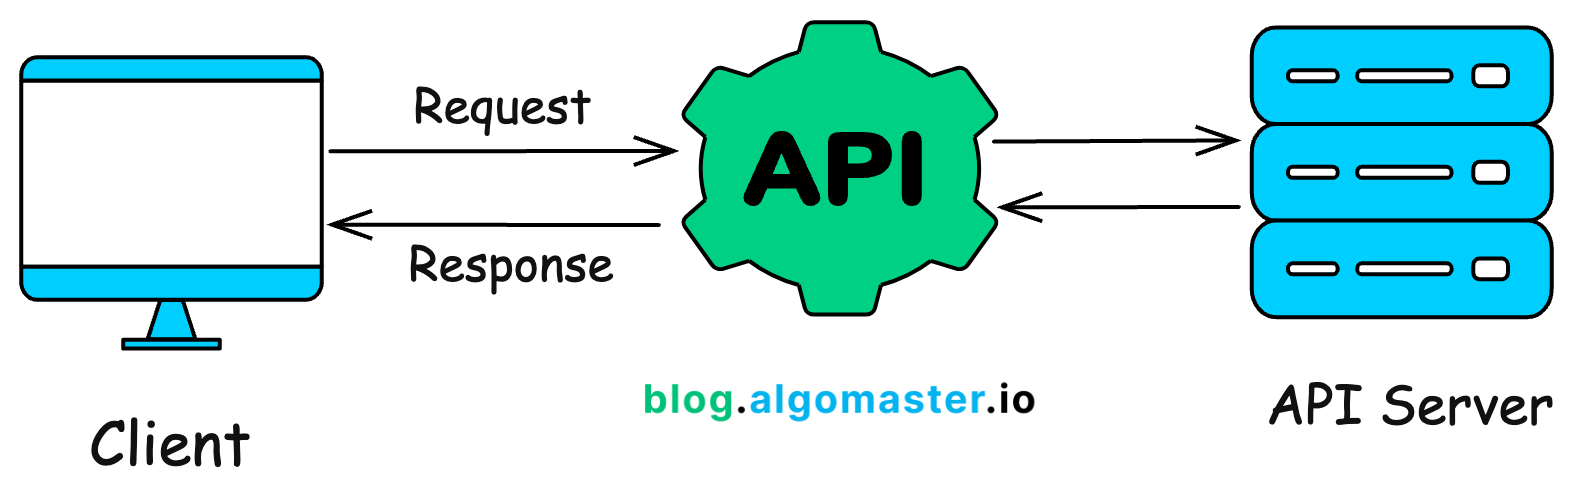
Think of an API as a middleman that allows clients (like web and mobile apps) to communicate with servers without worrying about low-level details.
Almost every digital service you use—social media, e-commerce, online banking, ride-hailing apps—is built on APIs working together behind the scenes.
Here’s how it typically works:
A client sends a request to an API.
The API, hosted on a server, processes the request, interacts with databases or other services, and prepares a response.
The API sends back the response in a structured format, usually JSON or XML, which the client understands and can display.
APIs provide a layer of abstraction—the client doesn’t need to know how the server processes the request, only that it returns the expected data.
If you want to learn more about APIs, checkout this article:

What's an API?
But, not all APIs are built the same. Different API styles exist to serve different needs. Two of the most popular ones are REST and GraphQL.
8. Rest API
Among the different API styles, REST (Representational State Transfer) is the most widely used.
A REST API follows a set of rules that define how clients and servers communicate over HTTP in a structured way.

Rest is:
- Stateless: Every request is independent; the server doesn’t store client state.
- Resource-Based: Everything is treated as a resource (e.g., /users, /orders, /products).
- Uses Standard HTTP Methods: Clients interact with resources using HTTP methods like:
- GET → Retrieves data (e.g., fetching a user profile).
- POST → Creates new data (e.g., adding a new user).
- PUT/PATCH → Updates existing data (e.g., changing user settings).
- DELETE → Removes data (e.g., deleting an account).
REST APIs are great because they’re simple, scalable, and easy to cache, but they have limitations, especially when dealing with complex data retrieval.
REST endpoints often return more data than needed, leading to inefficient network usage. If an API doesn’t return related data, the client may need to make multiple requests to retrieve all required information.
To address these challenges, GraphQL was introduced in 2015 by Facebook.
9. GraphQL
Unlike REST, which forces clients to retrieve fixed sets of data, GraphQL lets clients ask for exactly what they need—nothing more, nothing less.
With a REST API, if you need a user details, user profile details along with their recent posts, you might have to make multiple requests to different endpoints:
GET /api/users/123→ fetch user detailsGET /api/users/123/profile→ fetch user profileGET /api/users/123/posts→ fetch user’s posts
With GraphQL, you can combine those requests into one and fetch exactly the data you need in a single query:

The server responds with only the requested fields, reducing unnecessary data transfer and improving efficiency.
However, GraphQL also comes with trade-offs—it requires more processing on the server side and isn’t as easy to cache as REST.
Learn more about REST vs GraphQL here:

REST vs GraphQL
When a client makes a request, they usually want to store or retrieve data.
But this brings up another question—where is the actual data stored?
10. Databases
If our application deals with small amounts of data, we could store it in memory.
But modern applications handle massive volumes of data—far more than what memory can efficiently handle.
That’s why we need a dedicated server for storing and managing data—a database.
A database is the backbone of any application. It ensures that data is stored, retrieved, and managed efficiently while keeping it secure, consistent, and durable.
When a client requests to store or retrieve data, the server communicates with the database, fetches the required information, and returns it to the client.

But not all databases are the same. Different applications have different scalability, performance, and consistency requirements, which is choosing the right type of database is important.
If you want to learn about different types of databases, checkout this article:

15 Types of Databases and When to Use Them
March 24, 2024
In system design, we typically choose between SQL and NoSQL databases.
11. SQL vs NoSQL

SQL databases store data in tables with a strict predefined schema and follow the ACID properties.
- Atomicity - A transaction is all-or-nothing (it either completes fully or not at all).
- Consistency – Data always remains valid and follows defined rules.
- Isolation – Transactions don’t interfere with each other.
- Durability – Once data is saved, it won’t be lost, even if the system crashes.
Because of these guarantees, SQL databases are ideal for applications that require strong consistency and structured relationships, such as banking systems.
Examples of popular SQL databases include: MySQL and PostgreSQL
NoSQL databases on the other hand are designed for high scalability and performance.
They don’t require a fixed schema and use different data models, including:
- Key-Value Stores – Fast lookups for simple key-value pairs (e.g., Redis).
- Document Stores – Store flexible, JSON-like documents (e.g., MongoDB).
- Graph Databases – Best for highly connected data (e.g., Neo4j).
- Wide-Column Stores – Optimized for large-scale, distributed data (e.g., Cassandra).
So, which one should you use? It depends on the system requirements.
- If you need structured, relational data with strong consistency → SQL is a better choice.
- If you need high scalability, flexible schemas, or fast reads/writes at scale → NoSQL is a better choice.
Many modern applications use both SQL and NoSQL together.
For example, an e-commerce platform might:
- Store customer orders in SQL (because they require strict consistency).
- and store Product recommendations in NoSQL (because they need flexible and fast lookups).
If you want to learn more about SQL vs NoSQL, checkout this article:

SQL vs NoSQL – 7 Key Differences You Must Know
12. Vertical Scaling
As our user base grows, so does the number of requests hitting our application servers.
Initially, a single server might be enough to handle the load. But, as traffic increases, that single server can become a bottleneck, slowing everything down.
One of the quickest solutions is to upgrade the existing server by adding more CPU, RAM or storage.

This approach is called Vertical Scaling (Scaling Up)—making a single machine more powerful.
But there are some major limitations with this approach:
Hardware limits → You can’t keep upgrading a server forever. Every machine has a maximum capacity.
Cost → More powerful servers become exponentially more expensive.
Single Point of Failure (SPOF) → if this one server crashes, the entire system goes down.
So, while vertical scaling is a quick fix, it’s not a long-term solution for handling high traffic and ensuring system reliability.
Lets look at a better approach—one that makes our system more scalable and fault tolerant.
13. Horizontal Scaling
Instead of upgrading a single server, what if we add more servers to share the load?

This approach is called Horizontal Scaling (Scaling Out)—where we distribute the workload across multiple machines.
This approach is better because:
- More servers = More capacity → The system can handle increasing traffic more effectively.
- No Single Point of Failure → If one server goes down, others can take over, improving reliability.
- Cost-effective → Instead of investing in a single, super-expensive machine, we can use multiple affordable ones.
But horizontal scaling introduces a new challenge: how do clients know which server to connect to?
This is where a Load Balancer comes in.
14. Load Balancers
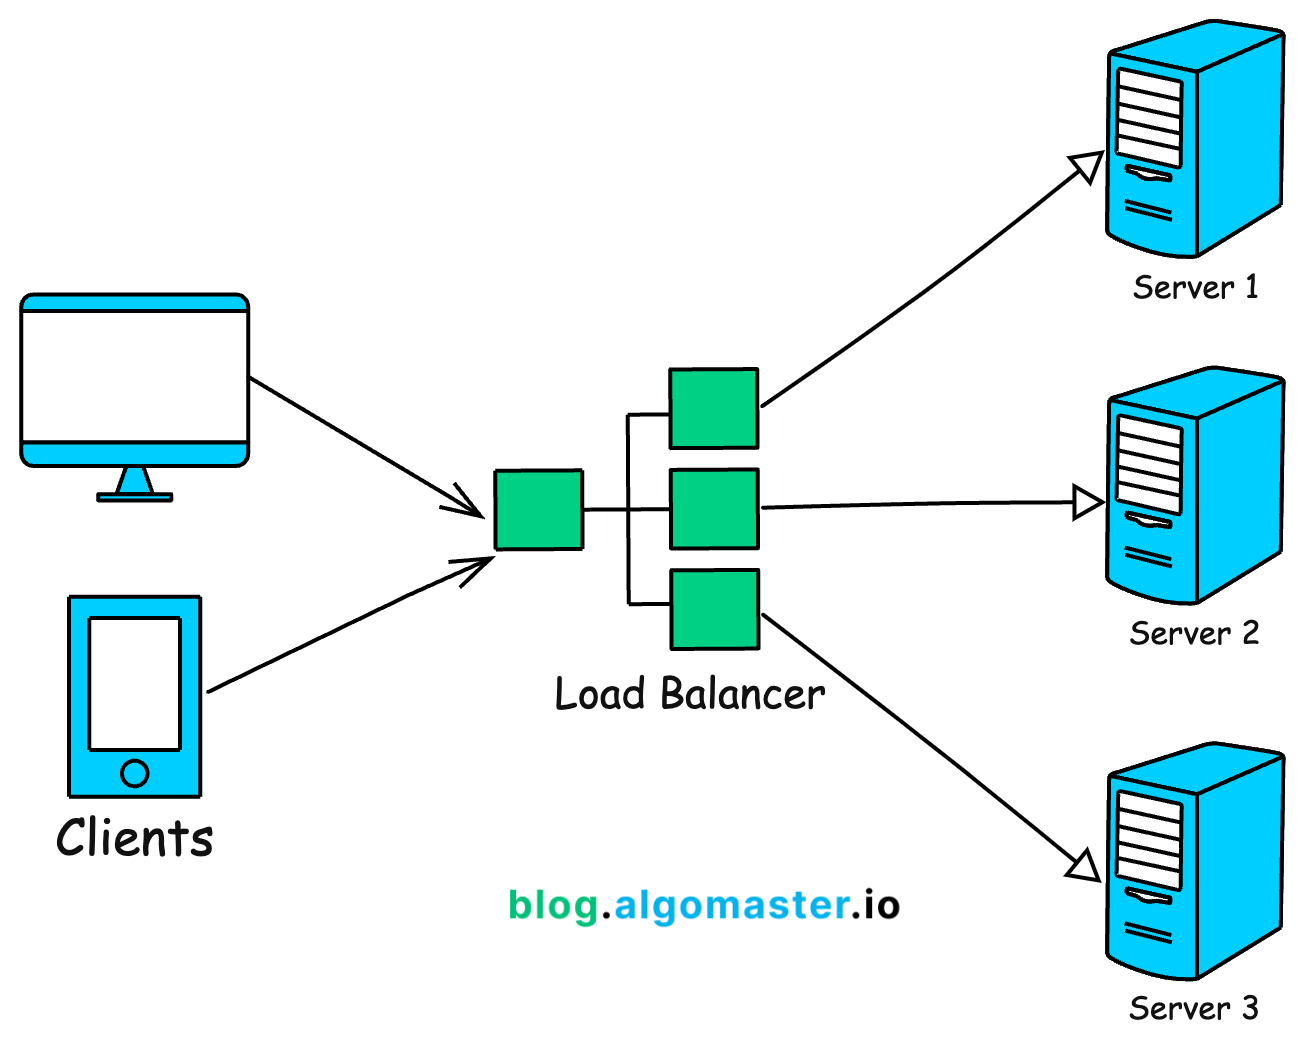
A Load Balancer sits between clients and backend servers, acting as a traffic manager that distributes requests across multiple servers.
If one server crashes, the Load Balancer automatically redirects traffic to another healthy server.
But how does a Load Balancer decide which server should handle the next request?
It uses Load Balancing algorithms, such as:
Round Robin → Requests are sent to servers sequentially, one after another in a loop.
Least Connections → Requests are sent to the server with the fewest active connections.
and IP Hashing → Requests from the same IP address always go to the same server, which helps with session consistency.
Learn more about load balancing algorithms here:

Load Balancing Algorithms Explained with Code
So far, we’ve talked about scaling our application servers, but as traffic grows, the volume of data also increases.
At first, we can scale a database vertically by adding more CPU, RAM, and storage, but there’s a limit to how much a single machine can handle.
So, let’s explore other database scaling techniques that help manage large volumes of data efficiently.
15. Database Indexing
One of the quickest and most effective ways to speed up database read queries is indexing.
Think of it like the index page at the back of a book—instead of flipping through every page, you jump directly to the relevant section.
A database index works the same way. It’s is a super-efficient lookup table that helps the database quickly locate the required data without scanning the entire table.

An index stores column values along with pointers to the actual data rows in the table.
Indexes are typically created on columns that are frequently queried, such as:
- Primary keys
- Foreign keys
- Columns used in WHERE conditions
But be careful—while indexes speed up reads, they slow down writes (INSERT, UPDATE, DELETE) since the index needs to be updated whenever data changes.
That’s why we should only index the most frequently accessed columns.
Learn more about Database Indexes here:

Database Indexes: A detailed guide
Indexing significantly improves read performance, but what if even indexing isn’t enough, and our database can’t handle the growing number of read requests?
That’s where our next database scaling technique Replication comes in.
16. Replication
Just like we added more application servers to handle traffic, we can scale our database by creating copies of it across multiple servers.

Here’s how it works:
- We have one primary database (also called the Primary Replica) that handles all write operations (
INSERT,UPDATE,DELETE). - We have multiple read replicas that handle read queries (SELECT).
- Whenever data is written to the primary database, it gets copied to the read replicas so that they stay in sync.
Replication improves the read performance since read requests are spread across multiple replicas, reducing the load on each one.
This also improves availability since if the primary replica fails, a read replica can take over as the new primary.
Replication is great for scaling read heavy applications, but what if we need to scale writes or store huge amounts of data?
17. Sharding
Let’s say our service now has millions of users, and our database has grown to terabytes of data.
A single database server will eventually struggle to handle all this data efficiently.
Instead of keeping everything in one place, we split the database into smaller, more manageable pieces and distribute them across multiple servers.

This technique is called Sharding.
- We divide the database into smaller parts called shards.
- Each shard contains a subset of the total data.
- Data is distributed based on a sharding key (e.g., user ID).
By distributing data this way, we:
- Reduce database load → Each shard handles only a portion of queries.
- Speed up read and write performance → Queries are distributed across multiple shards instead of hitting a single database.
Sharding is also referred to as horizontal partitioning since it splits data by rows.
If you want to learn more about Sharding, checkout this article:

What is Database Sharding?
May 12, 2024
But what if the issue isn’t the number of rows, but rather the number of columns?
In such cases, we use Vertical Partitioning, where we split the database by columns. Let’s explore that next.
18. Vertical Partitioning
Imagine we have a User table that stores:
- profile details (name, email, profile picture)
- login history (last_login, IP addresses)
- and billing information (billing address, payment details)
As this table grows, queries become slower because the database must scan many columns even when a request only needs a few specific fields.
To optimize this, we use Vertical Partitioning where we split user table into smaller, more focused tables based on usage patterns.

- User_Profile → Stores name, email, profile picture.
- User_Login → Stores login timestamps.
- User_Billing → Stores billing address, payment details.
This improves query performance since each request only scans relevant columns instead of the entire table.
It reduces unnecessary disk I/O, making data retrieval quicker.
However, no matter how much we optimize the database, retrieving data from disk is always slower than retrieving from memory.
What if we could store frequently accessed data in memory for lightning-fast access?
This is called caching.
19. Caching
Caching is used to optimize the performance of a system by storing frequently accessed data in memory instead of repeatedly fetching it from the database.
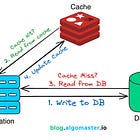
One of the most common caching strategies is the Cache Aside Pattern.
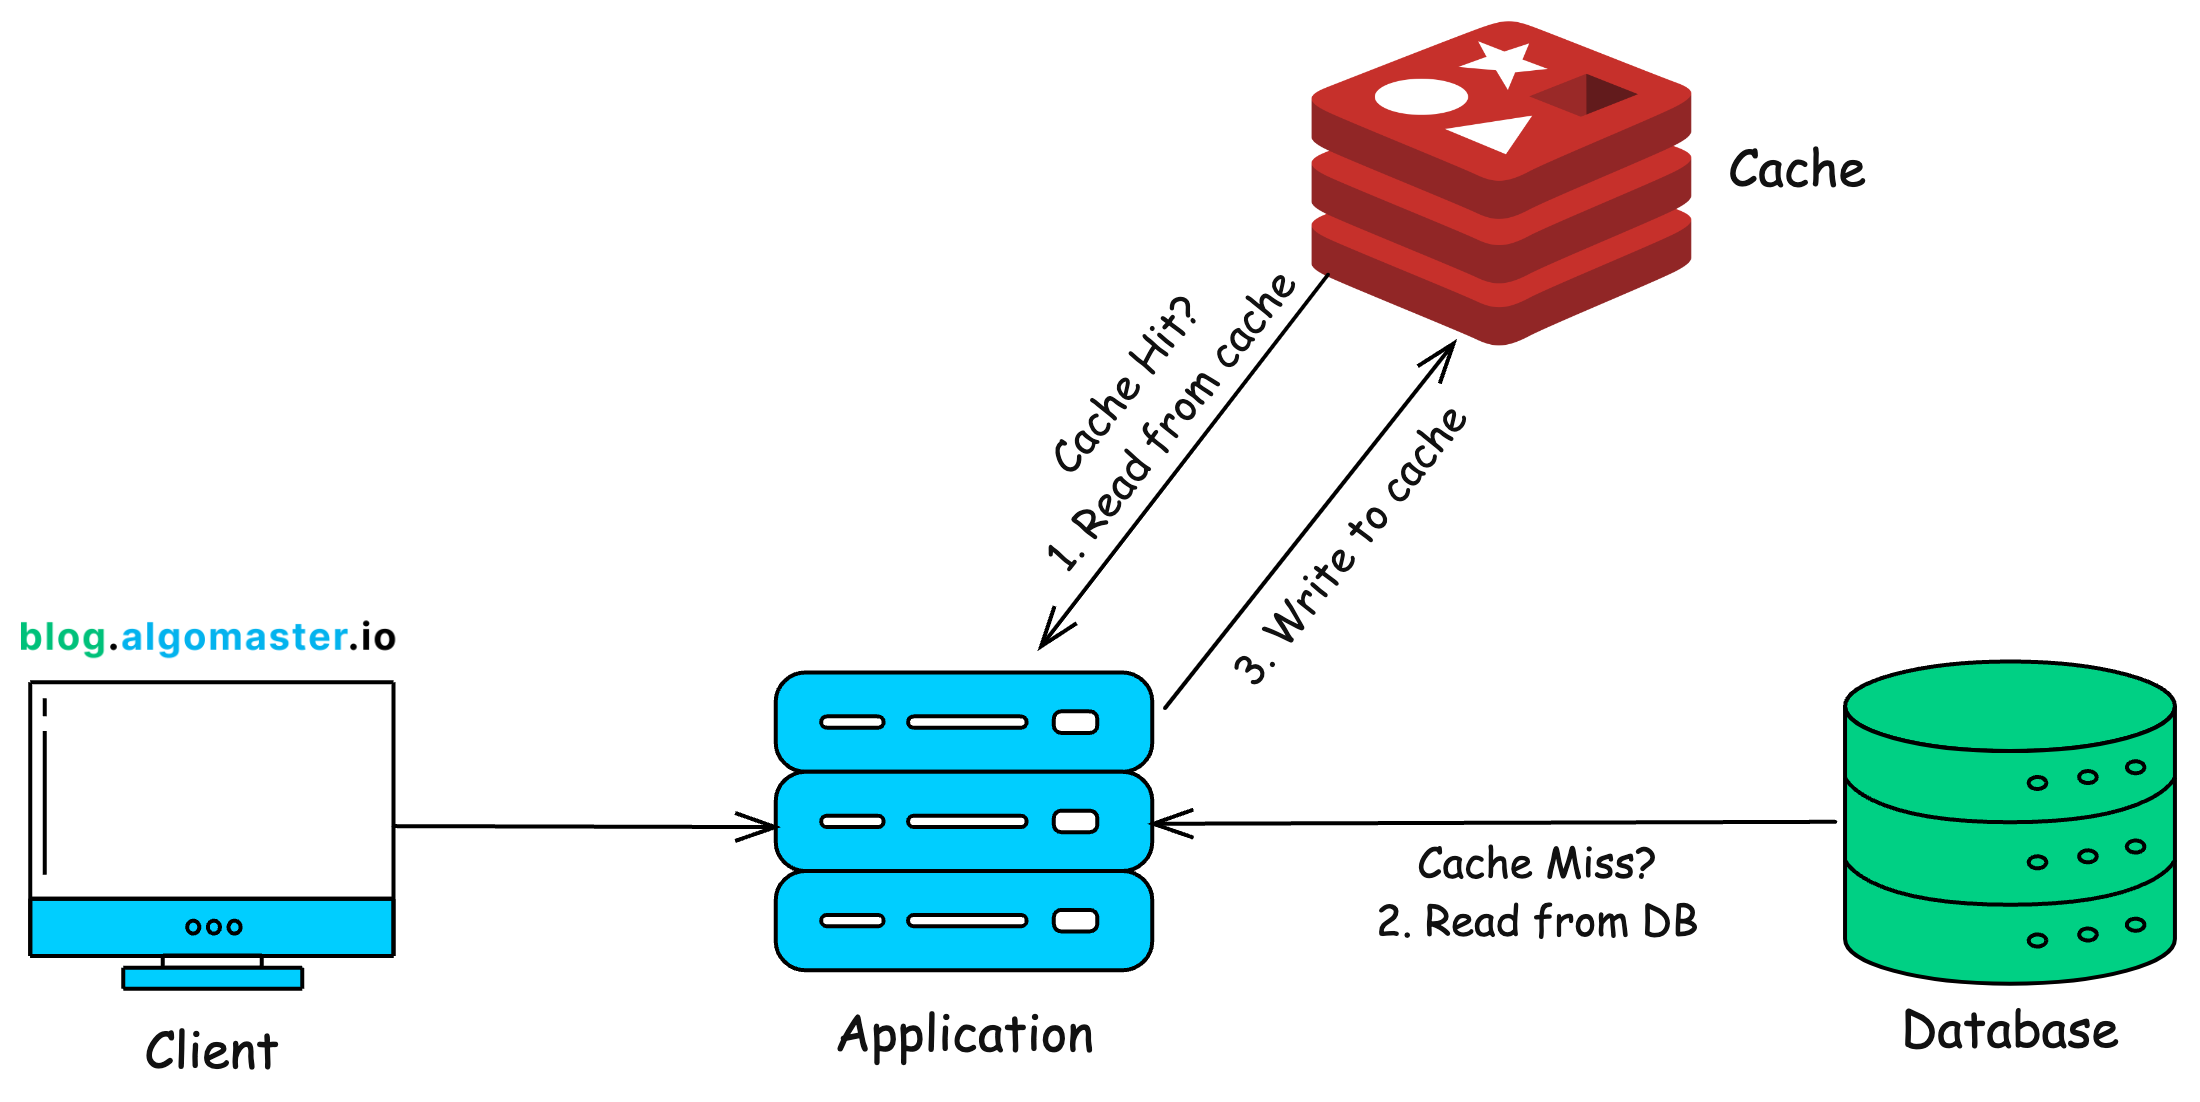
Here’s how it works:
When a user requests a data, the application first check the cache.
If the data is in the cache, it’s returned instantly, avoiding a database call.
If the data is not in the cache, the application retrieves it from the database, stores it in the cache for future requests, and returns it to the user.
Next time, the same data is requested, it’s served directly from cache, making the request much faster.
To prevent outdated data from being served, we use Time-to-Live (TTL)—an expiration time set on cached data so it gets automatically refreshed after a certain period.
Popular caching tools include Redis and Memcached.
If you want to learn more about caching strategies, check out this article:
Top 5 Caching Strategies Explained
Lets look at the next database scaling technique.
20. Denormalization
Most relational databases use Normalization to store data efficiently by breaking it into separate tables.
For example, in an e-commerce system:
- The Users table stores user details.
- The Orders table stores their orders.
- The Products table stores product details.
While this reduces redundancy, it also introduces joins. When retrieving data from multiple tables, the database must combine them using JOIN operations, which can slow down queries as the dataset grows.
SELECT o.order_id, u.name, u.email, o.product, o.amount
FROM orders o
JOIN users u ON o.user_id = u.user_id;
Denormalization reduces the number of joins by combining related data into a single table, even if it means some data gets duplicated.

Example: Instead of keeping Users and Orders in separate tables, we create UserOrders table that stores user details along with their latest orders.
Now, when retrieving a user’s order history, we don’t need a JOIN operation—the data is already stored together leading to faster queries and better read performance.
SELECT order_id, user_name AS name, user_email AS email, product, amount
FROM orders;
Denormalization is often used in read-heavy applications where speed is more critical but the downside is it leads to increases storage usage and more complex update requests.
21. CAP Theorem
As we scale our system across multiple servers, databases, and data centers, we enter the world of distributed systems.
One of the fundamental principles of distributed systems is the CAP Theorem, which states that: No distributed system can achieve all three of the following at the same time:

- Consistency © → Every node always returns the most recent data.
- Availability (A) → The system always responds to requests, even if some nodes are down (but the data may not be the latest).
- Partition Tolerance (P) → The system continues operating even if there’s a network failure between nodes.
Since network failures (P) are inevitable, we must choose between:
- Consistency + Partition Tolerance (CP) → Ensures every request gets the latest data but may reject requests during failures. Example: SQL databases like MySQL.
- Availability + Partition Tolerance (AP) → Ensures the system always responds, even if some data is stale. Example: NoSQL databases like Cassandra and DynamoDB.
To learn more about CAP theorem, check out this article:

CAP Theorem Explained
·
July 31, 2024
In distributed NoSQL databases, achieving instant consistency across all servers is too slow.
Instead, we use Eventual Consistency—which means:
- Not all nodes are updated instantly, but given enough time, they eventually sync and return the same data.
- This allows the system to remain highly available and fast, even under extreme loads.
How Eventual Consistency Works:
A user updates data in one replica of the database.
The system immediately acknowledges the update, ensuring high availability.
The update is then propagated asynchronously to other replicas.
After a short delay, all replicas have the latest data, ensuring consistency over time.
22. Blob Storage
Most modern applications don’t just store text records, they also need to handle images, videos, pdfs and other large files.
But here’s the problem: Traditional databases are not designed to store large, unstructured files efficiently.
So, what’s the solution?
We use Blob Storage like Amazon S3—a highly scalable and cost-effective way to store large, unstructured files in the cloud.

Blobs are the individual files like images, videos or documents.
These blobs are stored inside logical containers or buckets in the cloud.
Each file gets a unique URL, making it easy to retrieve and serve over the web.
Example: https://my-bucket-name.s3.amazonaws.com/videos/tutorial.mp4
There are several advantages with using blob storage like:
- Scalability → It can store petabytes of data effortlessly.
- Pay-as-you-go pricing → You only pay for storage and retrieval that you actually use.
- Automatic replication → Data is copied across multiple data centers and availability zones for durability.
- Easy access → Files can be retrieved using REST APIs or direct URLs.
A common use case is to stream audio or video files to user application in real-time.
But streaming directly from blob-storage can be slow, especially if the data is stored in a distant location.
23. CDN
For example, imagine you’re in India trying to watch a YouTube video that’s hosted on a server in California.
Since the video data has to travel across the world, this could lead to buffering and slow load times.
A Content Delivery Network (or CDN) solves this problem by delivering content faster to users based on their location.

source: https://www.cloudflare.com/learning/cdn/what-is-a-cdn/
A CDN is a global network of distributed servers that work together to deliver web content (like HTML pages, JavaScript files, stylesheets, images, and videos) to users based on their geographic location.
Instead of serving content from a single data center, a CDN caches static contents on multiple edge servers located worldwide.
When a user requests content, the nearest CDN server delivers it instead of reaching all the way to the origin server.
Since content is served from the closest CDN node, users experience faster load times with minimal buffering.
To learn more about CDN, check out this article:

What is a Content Delivery Network?
24. WebSockets
Most web applications use HTTP, which follows a request-response model.
The client sends a request.
The server processes the request and sends a response.
If the client needs new data, it must send another request.
This works fine for static web pages but it’s too slow and inefficient for real-time applications like: live chat apps, stock market dashboards and online multiplayer games.
With HTTP, the only way to get real-time updates is through polling—sending repeated requests every few seconds.
But polling is inefficient because it increases server load and wastes bandwidth, as most responses are empty (when there’s no new data).
WebSockets solve this problem by allowing continuous, two-way communication between the client and server over a single persistent connection.

Here is how WebSockets work:
The client initiates a WebSocket connection with the server.
Once established, the connection remains open.
The server can push updates to the client at any time, without waiting for a request.
The client can also send messages instantly to the server.
This enables real-time interactions and eliminates the need for polling.
To learn more about WebSockets, check out this article:

What are WebSockets and Why are they Used?
WebSockets enable real-time communication between a client and a server, but what if a server needs to notify another server when an event occurs?
Example:
- When a user makes a payment, Stripe needs to notify your application instantly.
- If someone pushes code to GitHub, a CI/CD system (e.g., Jenkins) should be triggered automatically.
Enter Webhooks.
25. Webhooks
Instead of constantly polling an API to check if an event has occured, Webhooks allow a server to send an HTTP request to another server as soon as the event occurs.

Here’s how it works:
- The receiver (your app) registers a webhook URL with the provider (e.g., Stripe, GitHub, Twilio).
- When an event occurs (e.g., user makes a payment), the provider sends an HTTP POST request to the webhook URL with event details.
- Your app processes the incoming request and updates data accordingly.
This saves server resources and reduces unnecessary API calls.
26. Microservices
Traditionally, applications were built using a monolithic architecture, where:
- All features (e.g., authentication, payments, orders, shipping) are inside one large codebase.
- If one part of the system fails or needs scaling, the entire system is affected.
- Deployment is risky—one bad update can take down the entire app.
Example: Imagine an e-commerce app where the order, payment, inventory, and shipping modules are all tightly connected in a single codebase.
If the inventory system crashes, the entire app could go down.
Monoliths work fine for small applications, but for large-scale systems, they become hard to manage, scale, and deploy.
The solution is to break down your application into smaller, independent services called micro-services that work together.

Each microservice:
Handles a single responsibility
Has its own database and logic, so it can scale independently.
Communicates with other microservices using APIs or message queues.
This way services can be scaled and deployed individually without affecting the entire system.
However, when multiple microservices need to communicate, direct API calls aren’t always efficient—this is where Message Queues come in.
27. Message Queues
In a monolithic system, functions call each other directly and wait for a response.
But in a microservices-based system, this approach is inefficient because:
- If one service is slow or down, everything waits.
- High traffic can overload a single service.
- Synchronous communication (waiting for immediate responses) doesn’t scale well.
A Message Queue enables services to communicate asynchronously, allowing requests to be processed without blocking other operations.

Here’s How It Works:
A producer (e.g., checkout service) places a message in the queue (e.g., “Process Payment”).
The queue temporarily holds the message until a consumer (e.g., payment service) is ready to process it.
The consumer retrieves the message and processes it.
Using message queues, we can decouple services and improve the scalability and fault tolerance.
Common message queue systems include: Apache Kafka, Amazon SQS and RabbitMQ.
To learn more about Message Queues, check out this article:

What are Message Queues and When to Use Them?
Using message queues, we can prevent overload on internal services within our system.
But, how do we prevent overload for the public APIs and services we deploy.
We use rate limiting.
28. Rate Limiting
Imagine a bot starts making thousands of requests per second to your website.
Without restrictions, this could:
- Crash your servers by consuming all available resources.
- Increase cloud costs due to excessive API usage.
- and degrade performance for legitimate users.
Rate Limiting restricts the number of requests a client can send within a specific time frame.

Here’s How It Works:
Every user or IP address is assigned a request quota (e.g., 100 requests per minute).
If they exceed this limit, the server blocks additional requests temporarily and returns an error (HTTP 429 – Too Many Requests).
There are various rate limiting algorithms. Some of the popular ones are:
- Fixed Window → Limits requests based on a fixed time window (e.g., 100 requests per minute).
- Sliding Window → More flexible version that dynamically adjusts limits to smooth out request bursts.
- Token Bucket → Users get tokens for requests, which replenish over time at a fixed rate.
To learn more about rate limiting algorithms, checkout this article:

Rate Limiting Algorithms Explained with Code
We don’t need to implement our own rate limiting system – this can be handled by something called an API gateway.
29. API Gateways
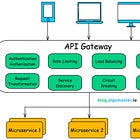
An API Gateway is a centralized service that handles authentication, rate limiting, logging and monitoring, and request routing.
Imagine a microservices-based application with multiple services.
Instead of exposing each service directly, an API Gateway acts as a single entry point for all client requests.

How API Gateways Work:
The client sends a request to the API Gateway.
The Gateway validates the request (e.g., authentication, rate limits).
It routes the request to the appropriate micro-service.
The response is sent back through the Gateway to the client.
API gateway simplifies API management and improves scalability and security.
Popular API Gateway solutions include NGINX, Kong and AWS API Gateway.
If you want to learn more about API gateways, checkout this article:
What is an API Gateway?
30. Idempotency
In distributed systems, network failures and service retries are common. If a user accidentally refreshes a payment page, the system might receive two payment requests instead of one.
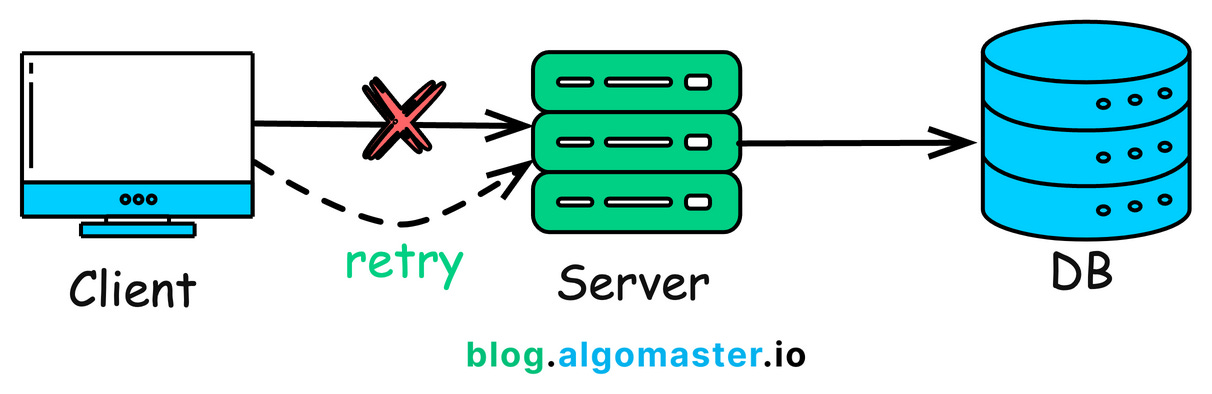
Idempotency ensures that repeated requests produce the same result as if the request was made only once.
Here’s how it works:
Each request is assigned a unique ID (e.g.,
request_1234).Before processing, the system checks if the request has already been handled.
If yes → It ignores the duplicate request.
If no → It processes the request normally.
Idempotency prevents duplicate transactions and ensures data consistency in distributed systems.
If you want to learn more about idempotency, checkout this article:

What is Idempotency in Distributed Systems?
Thank you so much for reading!
This post is public so feel free to share it.
System Design Concepts
 #SystemDesign #systemdesignconcepts #must-know
https://blog.algomaster.io/p/30-system-design-concepts
1. Client-Server Architecture
Almost every web application that you use is built on this simple yet powerful concept called client-server architecture.
On one side, you have a client—this could be a web browser, a mobile app, or any other frontend application.
and on the other side, you have a server—a machine that runs continuously, waiting to handle incoming requests.
The client sends a request to store, retrieve, or modify data.
The server receives the request, processes it, performs the necessary operations, and sends back a response.
This sounds simple, but there’s a big question: How does the client even know where to find the server?
2. IP Address
A client doesn’t magically know where a server is, it needs an address to locate and communicate with it.
On the internet, computers identify each other using IP addresses, which work like phone numbers for servers.
Every publicly deployed server has a unique IP address. When a client wants to interact with a service, it must send requests to the correct IP address.
But there’s a problem:
- When we visit a website, we don’t type its IP address—we just enter the website name.
- We can’t expect users (or even systems) to memorize a string of random numbers for every service they connect to.
- And if we migrate our service to another server, its IP address may change—breaking all direct connections.
3. DNS
Instead of relying on hard-to-remember IP addresses, we use something much more human-friendly: domain names.
But, we need a way to map a domain name to it’s corresponding IP address.
This is where DNS (or Domain Name System) comes in. It maps easy to remember domain names (like algomaster.io) to their corresponding IP addresses.
Here’s what happens behind the scenes:
When you type
algomaster.iointo your browser, your computer asks a DNS server for the corresponding IP address.Once the DNS server responds with the IP, your browser uses it to establish a connection with the server and make a request.
You can find the IP address of any domain using the ping command. Just open your terminal and type ping followed by the domain name. And it’ll return the IP address currently assigned to that domain.
4. Proxy / Reverse Proxy
When you visit a website, your request doesn’t always go directly to the server—sometimes, it passes through a proxy or reverse proxy first.
A proxy server acts as a middleman between your device and the internet.
When you request a webpage, the proxy forwards your request to the target server, retrieves the response, and sends it back to you.
Proxy hides your IP address, keeping your location and identity private.
A reverse proxy works the other way around. It intercepts client requests and forwards them to backend servers based on predefined rules.
Allowing direct access to servers can pose security risks, exposing them to threats like hackers and DDoS attacks.
A reverse proxy mitigates these risks by acting as a controlled entry point that regulates incoming traffic and hides server IPs.
It can also act as a load balancer, distributing traffic across multiple servers.
If you want to learn about Proxy vs Reverse Proxy in more detail, checkout this article:
Proxy vs Reverse Proxy (Explained with Examples)
·
October 30, 2024
5. Latency
Whenever a client communicates with a server, there’s always some delay. One of the biggest causes of this delay is physical distance.
For example, if our server is in New York, but a user in India sends a request, the data has to travel halfway across the world—and then the response has to make the same long trip back.
This round-trip delay is called latency—the total time it takes for data to travel between the client and the server. High latency can make applications feel slow and unresponsive.
One way to reduce latency is by deploying our service across multiple data centers worldwide.
This way, users can connect to the nearest server instead of waiting for data to travel across the globe.
Once a connection is made, how do clients and servers actually communicate?
6. HTTP/HTTPS
Every time you visit a website, your browser and the server communicate using a set of rules called HTTP (Hypertext Transfer Protocol).
That’s why most URLs start with http:// or its secure version, https://.
Here’s how it works:
- The client sends a request to the server. This request includes a header (containing details like the request type, browser type, and cookies) and sometimes a request body (which carries additional data, like form inputs).
- The server processes the request and responds with an HTTP response—either returning the requested data or an error message if something goes wrong.
HTTP has a major security flaw, it sends data in plain text. This is a serious problem, especially for sensitive information like passwords, credit card details, and personal data.
That’s why modern websites use HTTPS (Hypertext Transfer Protocol Secure) instead. HTTPS encrypts all data using SSL/TLS, ensuring that even if someone intercepts the request, they can’t read or alter it.
But clients and servers don’t directly exchange raw HTTP requests and response.
HTTP is just a protocol for transferring data but it doesn’t define:
- How requests should be structured
- What format responses should be in
- or how different clients should interact with the server.
This is where APIs (or Application Programming Interfaces) come in.
7. APIs
Think of an API as a middleman that allows clients (like web and mobile apps) to communicate with servers without worrying about low-level details.
Almost every digital service you use—social media, e-commerce, online banking, ride-hailing apps—is built on APIs working together behind the scenes.
Here’s how it typically works:
A client sends a request to an API.
The API, hosted on a server, processes the request, interacts with databases or other services, and prepares a response.
The API sends back the response in a structured format, usually JSON or XML, which the client understands and can display.
APIs provide a layer of abstraction—the client doesn’t need to know how the server processes the request, only that it returns the expected data.
If you want to learn more about APIs, checkout this article:
What's an API?
·
January 21, 2025
But, not all APIs are built the same. Different API styles exist to serve different needs. Two of the most popular ones are REST and GraphQL.
8. Rest API
Among the different API styles, REST (Representational State Transfer) is the most widely used.
A REST API follows a set of rules that define how clients and servers communicate over HTTP in a structured way.
Rest is:
- Stateless: Every request is independent; the server doesn’t store client state.
- Resource-Based: Everything is treated as a resource (e.g., /users, /orders, /products).
- Uses Standard HTTP Methods: Clients interact with resources using HTTP methods like:
- GET → Retrieves data (e.g., fetching a user profile).
- POST → Creates new data (e.g., adding a new user).
- PUT/PATCH → Updates existing data (e.g., changing user settings).
- DELETE → Removes data (e.g., deleting an account).
REST APIs are great because they’re simple, scalable, and easy to cache, but they have limitations, especially when dealing with complex data retrieval.
REST endpoints often return more data than needed, leading to inefficient network usage. If an API doesn’t return related data, the client may need to make multiple requests to retrieve all required information.
To address these challenges, GraphQL was introduced in 2015 by Facebook.
9. GraphQL
Unlike REST, which forces clients to retrieve fixed sets of data, GraphQL lets clients ask for exactly what they need—nothing more, nothing less.
With a REST API, if you need a user details, user profile details along with their recent posts, you might have to make multiple requests to different endpoints:
GET /api/users/123→ fetch user detailsGET /api/users/123/profile→ fetch user profileGET /api/users/123/posts→ fetch user’s posts
With GraphQL, you can combine those requests into one and fetch exactly the data you need in a single query:
The server responds with only the requested fields, reducing unnecessary data transfer and improving efficiency.
However, GraphQL also comes with trade-offs—it requires more processing on the server side and isn’t as easy to cache as REST.
Learn more about REST vs GraphQL here:
REST vs GraphQL
·
March 11, 2025
When a client makes a request, they usually want to store or retrieve data.
But this brings up another question—where is the actual data stored?
10. Databases
If our application deals with small amounts of data, we could store it in memory.
But modern applications handle massive volumes of data—far more than what memory can efficiently handle.
That’s why we need a dedicated server for storing and managing data—a database.
A database is the backbone of any application. It ensures that data is stored, retrieved, and managed efficiently while keeping it secure, consistent, and durable.
When a client requests to store or retrieve data, the server communicates with the database, fetches the required information, and returns it to the client.
But not all databases are the same. Different applications have different scalability, performance, and consistency requirements, which is choosing the right type of database is important.
If you want to learn about different types of databases, checkout this article:
15 Types of Databases and When to Use Them
·
March 24, 2024
In system design, we typically choose between SQL and NoSQL databases.
11. SQL vs NoSQL
SQL databases store data in tables with a strict predefined schema and follow the ACID properties.
- Atomicity - A transaction is all-or-nothing (it either completes fully or not at all).
- Consistency – Data always remains valid and follows defined rules.
- Isolation – Transactions don’t interfere with each other.
- Durability – Once data is saved, it won’t be lost, even if the system crashes.
Because of these guarantees, SQL databases are ideal for applications that require strong consistency and structured relationships, such as banking systems.
Examples of popular SQL databases include: MySQL and PostgreSQL
NoSQL databases on the other hand are designed for high scalability and performance.
They don’t require a fixed schema and use different data models, including:
- Key-Value Stores – Fast lookups for simple key-value pairs (e.g., Redis).
- Document Stores – Store flexible, JSON-like documents (e.g., MongoDB).
- Graph Databases – Best for highly connected data (e.g., Neo4j).
- Wide-Column Stores – Optimized for large-scale, distributed data (e.g., Cassandra).
So, which one should you use? It depends on the system requirements.
- If you need structured, relational data with strong consistency → SQL is a better choice.
- If you need high scalability, flexible schemas, or fast reads/writes at scale → NoSQL is a better choice.
Many modern applications use both SQL and NoSQL together.
For example, an e-commerce platform might:
- Store customer orders in SQL (because they require strict consistency).
- and store Product recommendations in NoSQL (because they need flexible and fast lookups).
If you want to learn more about SQL vs NoSQL, checkout this article:
SQL vs NoSQL – 7 Key Differences You Must Know
·
September 20, 2024
12. Vertical Scaling
As our user base grows, so does the number of requests hitting our application servers.
Initially, a single server might be enough to handle the load. But, as traffic increases, that single server can become a bottleneck, slowing everything down.
One of the quickest solutions is to upgrade the existing server by adding more CPU, RAM or storage.
This approach is called Vertical Scaling (Scaling Up)—making a single machine more powerful.
But there are some major limitations with this approach:
Hardware limits → You can’t keep upgrading a server forever. Every machine has a maximum capacity.
Cost → More powerful servers become exponentially more expensive.
Single Point of Failure (SPOF) → if this one server crashes, the entire system goes down.
So, while vertical scaling is a quick fix, it’s not a long-term solution for handling high traffic and ensuring system reliability.
Lets look at a better approach—one that makes our system more scalable and fault tolerant.
13. Horizontal Scaling
Instead of upgrading a single server, what if we add more servers to share the load?
This approach is called Horizontal Scaling (Scaling Out)—where we distribute the workload across multiple machines.
This approach is better because:
- More servers = More capacity → The system can handle increasing traffic more effectively.
- No Single Point of Failure → If one server goes down, others can take over, improving reliability.
- Cost-effective → Instead of investing in a single, super-expensive machine, we can use multiple affordable ones.
But horizontal scaling introduces a new challenge: how do clients know which server to connect to?
This is where a Load Balancer comes in.
14. Load Balancers
A Load Balancer sits between clients and backend servers, acting as a traffic manager that distributes requests across multiple servers.
If one server crashes, the Load Balancer automatically redirects traffic to another healthy server.
But how does a Load Balancer decide which server should handle the next request?
It uses Load Balancing algorithms, such as:
Round Robin → Requests are sent to servers sequentially, one after another in a loop.
Least Connections → Requests are sent to the server with the fewest active connections.
and IP Hashing → Requests from the same IP address always go to the same server, which helps with session consistency.
Learn more about load balancing algorithms here:
Load Balancing Algorithms Explained with Code
·
June 2, 2024
So far, we’ve talked about scaling our application servers, but as traffic grows, the volume of data also increases.
At first, we can scale a database vertically by adding more CPU, RAM, and storage, but there’s a limit to how much a single machine can handle.
So, let’s explore other database scaling techniques that help manage large volumes of data efficiently.
15. Database Indexing
One of the quickest and most effective ways to speed up database read queries is indexing.
Think of it like the index page at the back of a book—instead of flipping through every page, you jump directly to the relevant section.
A database index works the same way. It’s is a super-efficient lookup table that helps the database quickly locate the required data without scanning the entire table.
An index stores column values along with pointers to the actual data rows in the table.
Indexes are typically created on columns that are frequently queried, such as:
- Primary keys
- Foreign keys
- Columns used in WHERE conditions
But be careful—while indexes speed up reads, they slow down writes (INSERT, UPDATE, DELETE) since the index needs to be updated whenever data changes.
That’s why we should only index the most frequently accessed columns.
Learn more about Database Indexes here:
Database Indexes: A detailed guide
·
May 5, 2024
Indexing significantly improves read performance, but what if even indexing isn’t enough, and our database can’t handle the growing number of read requests?
That’s where our next database scaling technique Replication comes in.
16. Replication
Just like we added more application servers to handle traffic, we can scale our database by creating copies of it across multiple servers.
Here’s how it works:
- We have one primary database (also called the Primary Replica) that handles all write operations (
INSERT,UPDATE,DELETE). - We have multiple read replicas that handle read queries (SELECT).
- Whenever data is written to the primary database, it gets copied to the read replicas so that they stay in sync.
Replication improves the read performance since read requests are spread across multiple replicas, reducing the load on each one.
This also improves availability since if the primary replica fails, a read replica can take over as the new primary.
Replication is great for scaling read heavy applications, but what if we need to scale writes or store huge amounts of data?
17. Sharding
Let’s say our service now has millions of users, and our database has grown to terabytes of data.
A single database server will eventually struggle to handle all this data efficiently.
Instead of keeping everything in one place, we split the database into smaller, more manageable pieces and distribute them across multiple servers.
This technique is called Sharding.
- We divide the database into smaller parts called shards.
- Each shard contains a subset of the total data.
- Data is distributed based on a sharding key (e.g., user ID).
By distributing data this way, we:
- Reduce database load → Each shard handles only a portion of queries.
- Speed up read and write performance → Queries are distributed across multiple shards instead of hitting a single database.
Sharding is also referred to as horizontal partitioning since it splits data by rows.
If you want to learn more about Sharding, checkout this article:
What is Database Sharding?
·
May 12, 2024
But what if the issue isn’t the number of rows, but rather the number of columns?
In such cases, we use Vertical Partitioning, where we split the database by columns. Let’s explore that next.
18. Vertical Partitioning
Imagine we have a User table that stores:
- profile details (name, email, profile picture)
- login history (last_login, IP addresses)
- and billing information (billing address, payment details)
As this table grows, queries become slower because the database must scan many columns even when a request only needs a few specific fields.
To optimize this, we use Vertical Partitioning where we split user table into smaller, more focused tables based on usage patterns.
- User_Profile → Stores name, email, profile picture.
- User_Login → Stores login timestamps.
- User_Billing → Stores billing address, payment details.
This improves query performance since each request only scans relevant columns instead of the entire table.
It reduces unnecessary disk I/O, making data retrieval quicker.
However, no matter how much we optimize the database, retrieving data from disk is always slower than retrieving from memory.
What if we could store frequently accessed data in memory for lightning-fast access?
This is called caching.
19. Caching
Caching is used to optimize the performance of a system by storing frequently accessed data in memory instead of repeatedly fetching it from the database.
One of the most common caching strategies is the Cache Aside Pattern.
Here’s how it works:
When a user requests a data, the application first check the cache.
If the data is in the cache, it’s returned instantly, avoiding a database call.
If the data is not in the cache, the application retrieves it from the database, stores it in the cache for future requests, and returns it to the user.
Next time, the same data is requested, it’s served directly from cache, making the request much faster.
To prevent outdated data from being served, we use Time-to-Live (TTL)—an expiration time set on cached data so it gets automatically refreshed after a certain period.
Popular caching tools include Redis and Memcached.
If you want to learn more about caching strategies, check out this article:
Top 5 Caching Strategies Explained
·
October 24, 2024
Lets look at the next database scaling technique.
20. Denormalization
Most relational databases use Normalization to store data efficiently by breaking it into separate tables.
For example, in an e-commerce system:
- The Users table stores user details.
- The Orders table stores their orders.
- The Products table stores product details.
While this reduces redundancy, it also introduces joins. When retrieving data from multiple tables, the database must combine them using JOIN operations, which can slow down queries as the dataset grows.
SELECT o.order_id, u.name, u.email, o.product, o.amount
FROM orders o
JOIN users u ON o.user_id = u.user_id;
Denormalization reduces the number of joins by combining related data into a single table, even if it means some data gets duplicated.
Example: Instead of keeping Users and Orders in separate tables, we create UserOrders table that stores user details along with their latest orders.
Now, when retrieving a user’s order history, we don’t need a JOIN operation—the data is already stored together leading to faster queries and better read performance.
SELECT order_id, user_name AS name, user_email AS email, product, amount
FROM orders;
Denormalization is often used in read-heavy applications where speed is more critical but the downside is it leads to increases storage usage and more complex update requests.
21. CAP Theorem
As we scale our system across multiple servers, databases, and data centers, we enter the world of distributed systems.
One of the fundamental principles of distributed systems is the CAP Theorem, which states that: No distributed system can achieve all three of the following at the same time:
- Consistency © → Every node always returns the most recent data.
- Availability (A) → The system always responds to requests, even if some nodes are down (but the data may not be the latest).
- Partition Tolerance (P) → The system continues operating even if there’s a network failure between nodes.
Since network failures (P) are inevitable, we must choose between:
- Consistency + Partition Tolerance (CP) → Ensures every request gets the latest data but may reject requests during failures. Example: SQL databases like MySQL.
- Availability + Partition Tolerance (AP) → Ensures the system always responds, even if some data is stale. Example: NoSQL databases like Cassandra and DynamoDB.
To learn more about CAP theorem, check out this article:
CAP Theorem Explained
·
July 31, 2024
In distributed NoSQL databases, achieving instant consistency across all servers is too slow.
Instead, we use Eventual Consistency—which means:
- Not all nodes are updated instantly, but given enough time, they eventually sync and return the same data.
- This allows the system to remain highly available and fast, even under extreme loads.
How Eventual Consistency Works:
A user updates data in one replica of the database.
The system immediately acknowledges the update, ensuring high availability.
The update is then propagated asynchronously to other replicas.
After a short delay, all replicas have the latest data, ensuring consistency over time.
22. Blob Storage
Most modern applications don’t just store text records, they also need to handle images, videos, pdfs and other large files.
But here’s the problem: Traditional databases are not designed to store large, unstructured files efficiently.
So, what’s the solution?
We use Blob Storage like Amazon S3—a highly scalable and cost-effective way to store large, unstructured files in the cloud.
Blobs are the individual files like images, videos or documents.
These blobs are stored inside logical containers or buckets in the cloud.
Each file gets a unique URL, making it easy to retrieve and serve over the web.
Example: https://my-bucket-name.s3.amazonaws.com/videos/tutorial.mp4
There are several advantages with using blob storage like:
- Scalability → It can store petabytes of data effortlessly.
- Pay-as-you-go pricing → You only pay for storage and retrieval that you actually use.
- Automatic replication → Data is copied across multiple data centers and availability zones for durability.
- Easy access → Files can be retrieved using REST APIs or direct URLs.
A common use case is to stream audio or video files to user application in real-time.
But streaming directly from blob-storage can be slow, especially if the data is stored in a distant location.
23. CDN
For example, imagine you’re in India trying to watch a YouTube video that’s hosted on a server in California.
Since the video data has to travel across the world, this could lead to buffering and slow load times.
A Content Delivery Network (or CDN) solves this problem by delivering content faster to users based on their location.
source: https://www.cloudflare.com/learning/cdn/what-is-a-cdn/
A CDN is a global network of distributed servers that work together to deliver web content (like HTML pages, JavaScript files, stylesheets, images, and videos) to users based on their geographic location.
Instead of serving content from a single data center, a CDN caches static contents on multiple edge servers located worldwide.
When a user requests content, the nearest CDN server delivers it instead of reaching all the way to the origin server.
Since content is served from the closest CDN node, users experience faster load times with minimal buffering.
To learn more about CDN, check out this article:
What is a Content Delivery Network?
·
March 4, 2025
24. WebSockets
Most web applications use HTTP, which follows a request-response model.
The client sends a request.
The server processes the request and sends a response.
If the client needs new data, it must send another request.
This works fine for static web pages but it’s too slow and inefficient for real-time applications like: live chat apps, stock market dashboards and online multiplayer games.
With HTTP, the only way to get real-time updates is through polling—sending repeated requests every few seconds.
But polling is inefficient because it increases server load and wastes bandwidth, as most responses are empty (when there’s no new data).
WebSockets solve this problem by allowing continuous, two-way communication between the client and server over a single persistent connection.
Here is how WebSockets work:
The client initiates a WebSocket connection with the server.
Once established, the connection remains open.
The server can push updates to the client at any time, without waiting for a request.
The client can also send messages instantly to the server.
This enables real-time interactions and eliminates the need for polling.
To learn more about WebSockets, check out this article:
What are WebSockets and Why are they Used?
·
August 28, 2024
WebSockets enable real-time communication between a client and a server, but what if a server needs to notify another server when an event occurs?
Example:
- When a user makes a payment, Stripe needs to notify your application instantly.
- If someone pushes code to GitHub, a CI/CD system (e.g., Jenkins) should be triggered automatically.
Enter Webhooks.
25. Webhooks
Instead of constantly polling an API to check if an event has occured, Webhooks allow a server to send an HTTP request to another server as soon as the event occurs.
Here’s how it works:
- The receiver (your app) registers a webhook URL with the provider (e.g., Stripe, GitHub, Twilio).
- When an event occurs (e.g., user makes a payment), the provider sends an HTTP POST request to the webhook URL with event details.
- Your app processes the incoming request and updates data accordingly.
This saves server resources and reduces unnecessary API calls.
26. Microservices
Traditionally, applications were built using a monolithic architecture, where:
- All features (e.g., authentication, payments, orders, shipping) are inside one large codebase.
- If one part of the system fails or needs scaling, the entire system is affected.
- Deployment is risky—one bad update can take down the entire app.
Example: Imagine an e-commerce app where the order, payment, inventory, and shipping modules are all tightly connected in a single codebase.
If the inventory system crashes, the entire app could go down.
Monoliths work fine for small applications, but for large-scale systems, they become hard to manage, scale, and deploy.
The solution is to break down your application into smaller, independent services called micro-services that work together.
Each microservice:
Handles a single responsibility
Has its own database and logic, so it can scale independently.
Communicates with other microservices using APIs or message queues.
This way services can be scaled and deployed individually without affecting the entire system.
However, when multiple microservices need to communicate, direct API calls aren’t always efficient—this is where Message Queues come in.
27. Message Queues
In a monolithic system, functions call each other directly and wait for a response.
But in a microservices-based system, this approach is inefficient because:
- If one service is slow or down, everything waits.
- High traffic can overload a single service.
- Synchronous communication (waiting for immediate responses) doesn’t scale well.
A Message Queue enables services to communicate asynchronously, allowing requests to be processed without blocking other operations.
Here’s How It Works:
A producer (e.g., checkout service) places a message in the queue (e.g., “Process Payment”).
The queue temporarily holds the message until a consumer (e.g., payment service) is ready to process it.
The consumer retrieves the message and processes it.
Using message queues, we can decouple services and improve the scalability and fault tolerance.
Common message queue systems include: Apache Kafka, Amazon SQS and RabbitMQ.
To learn more about Message Queues, check out this article:
What are Message Queues and When to Use Them?
·
August 18, 2024
Using message queues, we can prevent overload on internal services within our system.
But, how do we prevent overload for the public APIs and services we deploy.
We use rate limiting.
28. Rate Limiting
Imagine a bot starts making thousands of requests per second to your website.
Without restrictions, this could:
- Crash your servers by consuming all available resources.
- Increase cloud costs due to excessive API usage.
- and degrade performance for legitimate users.
Rate Limiting restricts the number of requests a client can send within a specific time frame.
Here’s How It Works:
Every user or IP address is assigned a request quota (e.g., 100 requests per minute).
If they exceed this limit, the server blocks additional requests temporarily and returns an error (HTTP 429 – Too Many Requests).
There are various rate limiting algorithms. Some of the popular ones are:
- Fixed Window → Limits requests based on a fixed time window (e.g., 100 requests per minute).
- Sliding Window → More flexible version that dynamically adjusts limits to smooth out request bursts.
- Token Bucket → Users get tokens for requests, which replenish over time at a fixed rate.
To learn more about rate limiting algorithms, checkout this article:
Rate Limiting Algorithms Explained with Code
·
July 17, 2024
We don’t need to implement our own rate limiting system – this can be handled by something called an API gateway.
29. API Gateways
An API Gateway is a centralized service that handles authentication, rate limiting, logging and monitoring, and request routing.
Imagine a microservices-based application with multiple services.
Instead of exposing each service directly, an API Gateway acts as a single entry point for all client requests.
How API Gateways Work:
The client sends a request to the API Gateway.
The Gateway validates the request (e.g., authentication, rate limits).
It routes the request to the appropriate micro-service.
The response is sent back through the Gateway to the client.
API gateway simplifies API management and improves scalability and security.
Popular API Gateway solutions include NGINX, Kong and AWS API Gateway.
If you want to learn more about API gateways, checkout this article:
What is an API Gateway?
·
December 8, 2024
30. Idempotency
In distributed systems, network failures and service retries are common. If a user accidentally refreshes a payment page, the system might receive two payment requests instead of one.
Idempotency ensures that repeated requests produce the same result as if the request was made only once.
Here’s how it works:
Each request is assigned a unique ID (e.g.,
request_1234).Before processing, the system checks if the request has already been handled.
If yes → It ignores the duplicate request.
If no → It processes the request normally.
Idempotency prevents duplicate transactions and ensures data consistency in distributed systems.
If you want to learn more about idempotency, checkout this article:
What is Idempotency in Distributed Systems?
·
November 3, 2024
Thank you so much for reading!
If you found it valuable, hit a like ❤️ and consider subscribing for more such content every week.
This post is public so feel free to share it.
P.S. If you’re enjoying this newsletter and want to get even more value, consider becoming a paid subscriber.
As a paid subscriber, you'll unlock all premium articles and gain full access to all premium courses on algomaster.io.